Pages

Thursday, 22 December 2011

Christmas gifting: home made truffles


I spotted an incredible looking recipe for 'Mogador' macarons by Pierre Hermé in the Financial Times a few weeks back, crisp macaron shells around a highly-scented ganache of milk chocolate and aromatic passion fruit. It sounded such a delicious mixture that I just had to try my own version, in these truffles.

I think they're a success - the sharp, fragrant fruit juice makes a good foil to the creamy, smooth milk chocolate. They're very moreish, so although I say this recipe makes 30, I'm betting that only 20 make it out of the kitchen and into someones stocking...

MILK CHOCOLATE PASSION FRUIT TRUFFLES
Makes about 30

325g milk chocolate
175ml double cream
6½ tbsp fresh passion fruit juice, sieved to remove seeds (about 6 large passion fruits)
20g butter
250g white or dark chocolate to coat

1) Place all the ingredients except the white or dark chocolate in a bowl over a bowl of barely simmering water until it has all melted together, stirring occasionally. Mix well until combined, then leave to cool. Cover and refrigerate for a few hours or overnight if you can.

2) Scoop out balls with a ½ teaspoon measure, then roll between your hands to smooth and place on a greaseproof paper covered tray. You may find it helps to keep a cup of boiling water to hand which you can periodically dip the scoop into, drying it first on a tissue.

3) Freeze the balls for an hour then melt the white or dark chocolate and, using a toothpick to hold each truffle ball, quickly dip each one into the melted chocolate, shaking off any excess. Leave to dry on greaseproof paper, then decorate by drizzling with more melted chocolate.

Friday, 16 December 2011

Pampered with hampers

At this time of year I start to fantasise about the much-anticipated rest ahead - lazy lie ins, breakfasts in bed and possibly even the occasional afternoon nap in front of some Christmas tv. And the only thing I can imagine that would make any of these activities any more alluring would be a magnificent hamper of culinary goodies to tear into.

This week, I have mainly been daydreaming about...

The Bompas & Parr Adventure Hamper, £699, from Selfridges (limited edited of 5)
Not so much a hamper as a survival kit - this includes antimalarial cucumber and quinine gele, pickled shallots and juniper for jellyfish stings, raspberry and violet jam for altitude sickness, plus some kendal mint cake in case you get lost between the bed and the kitchen. Not sure what I'd use the pick axe for over the Christmas holiday but I do love a practical gift.

Hamper for two with lobster and crabs, £75, The Colchester Oyster Fishery
Ever since my trip to Essex and my first taste of their delicious oysters, I've wanted more, more, MORE! If I had this hamper, I could sip champagne and oysters on Boxing Day morning. Bliss.

Annabel's Limited Edition hamper, £3000, The Mount Street Deli
The best of everything, with a Christmassy bias towards panforte and hot chocolate. I can't hope to ever receive this under the Christmas tree so I should probably start saving now.

Sunday, 11 December 2011

Dry and mighty

Clockwise from top left: Live by the sun Love by the moon by knifeinthewater; Peony tea towel by Bloomsong; Kereru bird by melinamartin; Tea On The Go by slidesideways

The never-ending onslaught of yuletide cheer has brought back a recurrence of last years wet and wild teatowel fantasies, with these little beauties at the top of my wishlist for stylish drying in 2012.

Yes, at least one friend, family or unsuspecting secret santa receiver will be gifted tea towels this year.  Apologies if it's you.  But this seemingly dull present is, I think, forgivable for its solid pragmatism.  When William Morris demanded - 'have nothing in your house that you do not know to be useful or believe to be beautiful’ - he was bang on the money.  

For me, these comely teatowels tick all the right utilitarian boxes, and best of all they're available through that most diverse site, the lovely Etsy.  Thanks Etsy, I don't know how I'd do Christmas without you!

Friday, 9 December 2011

Dear Santa


Dear Santa,

Please, please, please could you find me one of these gnocchi boards for sale in the UK?

I've looked everywhere but there's nothing. I promise that I'll be extra good in 2012. I'll sort out my spice rack, my dishes will ever be spotless, and my shoes always polished.

Just let me have authentic, soft pillowy gnocchi with ridged edges for my sauces to cling to, without international postage costs.

thanks Santa, you're a star x
thanks in advance

Irv x

Tuesday, 6 December 2011

The Poacher

Drying Cluster Domecap mushrooms by thinly slicing and air-drying
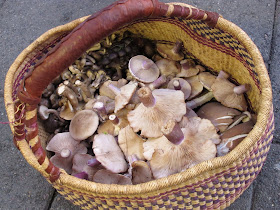
Jon the Poacher's basket of mushroom wonders with Field Blewits, Oyster mushrooms and Cluster Domecaps

When I was a child there were three majestic apple trees in our back garden, which never failed to produce an incredibly Autumn bounty, year on year. Those gluts would allow (or should I say force?) us to make enough pies, crumbles and streudels to keep us going for pretty much the whole winter. But always with some saved for our daily lunchboxes, perhaps one of the smaller, woodier Blenheim Orange variety that I still dream about but can never find.

Since those heady days of excess I've not had much luck with foraging, though I love the idea of being able to live away from the supermarkets. Like every frustrated city dweller with an itch that can't be scratched, I've read Richard Mabey's Food For Free and dabbled with other fungi guides, but never been brave or foolish enough to take the plunge and eat what I pick. But that all changed last weekend when I went out with my friend Andy, who'd been promising to show me the foragable goodies in London's Hackney area for quite some time.

We lucked out with the weather - only briefly rainy, giving way to clear skies and a crisp, fresh day. The first mushrooms Andy pointed out were like magic - small, lavender-stemmed Field Blewits. Very good to eat if cooked, and prolific in this particular field. Once I'd seen one it was like a veil had lifted and I started to spot them everywhere!

I was just learning how to cut, clean and store the blewits when a man approached us carrying an incredible wicker basket of mushrooms (I fineagled the photo above). It turned out that our mysterious stranger lived locally and picked mushrooms to sell to the restaurant trade. And for some reason, was happy to walk us through some of the places he knew that were good for mushrooms. Amazing! We spent a fascinating couple of hours with Jon the Poacher as he walked us through some of his favourite places. Every time we found a new species, or a monster big one (I am, of course, impressed by size) I couldn't help but giggle like a small child. So much fun.

We ended up with more than a kilo of mixed wild mushrooms to play with. After some fantastic garlic mushrooms on toast, the rest were thrown into this soup, which I think is hard to improve.

EASY WILD MUSHROOM SOUP (FIELD BLEWIT SOUP)

Serves 4 as a starter

650g wild mushrooms (Field Blewits if you can get them)
1 medium onion, finely diced
1 fat clove of garlic, finely sliced
850ml light vegetable stock
a handful of chives (7g)
a handful of parsley (7g)
olive oil
a splash of single (light) cream

1) Cut the mushrooms into 5mm slices and add a tablespoon of oil to a large non-stick frying pan and put this onto a medium heat. Fry the mushrooms in batches, taking care not to overcrowd the pan and adding more oil as needed, then set the mushrooms aside.

2) In a large saucepan, fry the onion in a tablespoon of olive oil for ten minutes until translucent and soft, then add the garlic. Continue to fry until lightly browned, then add the mushrooms and stock. Bring up to a simmer then remove from the heat and allow to cool for five minutes before blending until smooth. Add the fresh herbs and blend again until the herbs are finely chopped through the soup. Add a splash of cream to taste (I used about 3 tablespoons), and serve with a hunk of crusty bread and butter.

Wednesday, 23 November 2011

Great Scott


Cocktails. The perfect end to an endless week. I was chomping at the bit to get out of the office on Friday - not because I've fallen out of love with work (I still find my job rather intriguing) but because I was so looking forwards to ending up at the Gilbert Scott Bar in the St. Pancras Hotel.

The design is a bit divisive - you either love it or hate it. A vast Gothic fantasy, it towers over Euston Road like a ghostly character from an Edward Gorey book. It's an eccentric building, imposing and cathedral-like on the outside but with a richly decorated interior, an appropriately decadent backdrop for elegantly pickling your liver. The building was recently zhushed up in a multi-squillion (ok that could be an exaggeration) redevelopment, reopening a few months ago. I may now be biased, but I do think the Gilbert Scott Bar is the jewel in the crown.

Fantastic thing #1: The bar food is provided by chef Marcus Wareing, who runs the adjacent restaurant. We were heading off for dinner elsewhere but nibbled on deliciously fresh and crisp Southwold fried whitebait, served with a chunky, spiced ketchup.

Fantastic thing #2: The decor is out of this world. There's a 1930s vibe layered over the original Victorian grandeur. The lighting is low, the bar staff are handsome, and the expensive zhushing has been subtle but effective. I was very taken by the giant gilded bells that hang from on high as light features.

Fantastic thing #3: (And most importantly), the cocktails are utterly delicious. This is possibly the best way to spend a spare tenner in London if you are in need of some TLC.

We tried a Doctor Kermann (lillet, Amer Picon, Appleton 8 yrs, Ricard, quinine and grapefruit) which was tart and perfect for bringing me back to life after a long day. But my favourite was the Sea Buckthorn Shrub (Bacardi superior, sea buckthorn, mint, lime, yellow Chartreuse and blackberry) - a creamy, luxurious blend of citrussy flavours, alternating between sharp, aromatic and a deceptive smoothness. I say deceptive because we were very jolly when we left.

The cocktail menu changes regularly so these may not be around for long so catch them while you can...


Tuesday, 22 November 2011

Smoky cornbread muffins


What better way to fend off the winter doldrums than baking?  I've seen such a flurry of thanksgiving recipes recently that it seemed time for me to try out some of the classics - starting with this smoky cornbread.

I love the idea of celebrating with food, and thanksgiving seems to trump even the feasting excesses of Christmas for our American friends.  I have to admit that I feel slightly jealous - why does the US get two food-fests at this time of year while we get only one?  There's only so much a girl can eat on Christmas day!  Tut.

Reading up on the must-have thanksgiving dishes made me realise how little I knew about this type of food.  These cornbread muffins are delish, and excellent with the spicy soups and stews that have started to creep onto my table this month.  But I will need time, and possibly therapy, to come to terms with the dish of mashed sweet potato topped with mini-marshmallows. 

I've added smoked paprika to this classic cornbread recipe for the sweet aromatic note it lends - probably beyond the pale for a traditional thanksgiving dinner, but I think I can get away with it over here in London.

CORNBREAD MUFFINS WITH SMOKED PAPRIKA
Makes 12

190g (1½ cups)fine cornmeal
1 tbsp golden caster sugar
75g (½ cup) plain white flour
½ tsp smoked paprika
1 tsp sea salt
3½ tsp baking powder
1 cup of fresh sweetcorn, cut from the cobs (or frozen sweetcorn)
3 large eggs
415ml (2 cups) milk
2 fresh green chillies, finely chopped
75g (5 tbsp) melted butter

plus, a dozen 12cm squares of greaseproof paper

1) Sieve the dry ingredients - flour, cornmeal, sugar, paprika, sea salt and baking powder - together into a large bowl.

2) In another bowl, whisk together the eggs, milk, melted butter and green chilli, then stir in the sweetcorn. Fold gently into the dry flour mixture, taking care not to overmix it, or it the muffins will be chewy and tough.

3) Tuck the greaseproof squares into the bases of 12 deep muffin tins, then spoon the mixture equally between the cases. Bake at 450f/220c/gas mark 7 for 16-19 minutes, or until golden and cooked through.

Monday, 14 November 2011

Winter warmer


Beyond the frankly tropical climate of my office at work, winter has taken hold in earnest this past week. I've grudgingly rescued last years gloves and scarves from the back of the cupboard, and come to terms with having them on now for the next six months. Sigh. Goodbye autumn, you were beautiful while you lasted.

One of the few things that I relish about winter is the prospect of cooking great steaming vats of vegetable soups and stews. There really is nothing quite as heartwarming as sinking your teeth into a soft, gravy soaked dumpling or a crust of buttered,soup-stained bread on a cold day. Soups like this one, where the veg are roasted first, have a sweet intensity that makes me forget that I won't be leaving the house with bare legs again for half a year. Roll on Summer 2012...


ROASTED TOMATO, CHILLI AND ROSEMARY SOUP

1.5kg ripe plum (or other small sweet) tomatoes
1 large onion, finely chopped
3 cloves garlic, finely chopped
1 large fresh red chilli, deseeded and finely chopped
1 tsp fresh rosemary leaves, finely chopped
350ml vegetable stock
3 tbsp olive oil

1) Place the tomatoes in a large roasting tin and toss in one tablespoon of the oil. Cook at 375f/190c/gas 5 for 45 minutes - take care as you remove the tin from the oven as the tomatoes will have released lots of piping hot juices.

2) Meanwhile, cook the onion over a medium heat in the remaining olive oil for ten minutes, or until soft and translucent. Add the garlic, chilli and rosemary and fry for another five minutes, stirring often to prevent the garlic from burning. Add the cooked tomatoes, tomato juices and stock, and allow to cool.

3) After five minutes, blitz in an electric blender until very smooth, then strain through a fine sieve (you don't have to do this but I find the tomato pips a bit distracting otherwise), and check for seasoning. Add a little salt if necessary before serving.

Wednesday, 9 November 2011

Where the wild things are


I find it hard to resist an old fashioned drink, especially one so redolent of Hunter wellies, frozen hedgerows, P.G. Wodehouse and all things quintessentially English.

I dragged my boy off to Hackney Marshes in East London a couple of weekends ago in search of the same blackthorn bush that had given me such fat, juicy fruits last year. Yes, he is a very kind and patient man. We've had some cold nights here recently so it seemed a good time to go - they say you shouldn't pick sloes until after the first frost.

Although sloes are supposedly common in the UK they're not something I've noticed around - must be more of a countryside thing than a Bloomsbury thing. So I was pleased as punch to stumble over a few bushes dripping with berries quite by accident last year. It seemed like providence that I should try making sloe gin.  One experimental pound of sloes bore two ruby-red bottles of glorious liquor. I loved the deep, heady flavour, but sadly so did all my friends, and it was gone by Christmas. This year I'm making double.

SLOE GIN

2lb sloes
2 litres of good quality gin
16oz caster sugar

1) Wash the sloes thoroughly and dry completely. Making sloe gin needs no skill but a lot of patience: use a clean, sterilised needle to prick every fruit all over. This does take a while, but it's a bit like podding peas - rather relaxing and zen once you get into the rhythm of it.

2) Using a funnel, divide the sloes, gin and sugar up between several large, sterilised glass kilner jars or wide-necked bottles and leave in a dark, cool place to mature. Give each bottle a little shake twice a week for the next three months. At this point they're ready to drink, though they will improve with age.

Monday, 7 November 2011

The London Honey Company


Ah, the sweet smell of accidental success! I stumbled across the London Honey Company's open house at Maltby Street a couple of weekends ago, not entirely on purpose. But what a wonderful accident... Their office doubles up as a workshop where they cut the honeycombs and coax honey from wooden frames.  The air is thick with the intoxicating scent of busy bees work.

Steve the beekeeper is on a mission to get us to try London's delights, bringing us honeys from the breadth of this city and beyond.  I chose a sticky wedge of honeycomb from Wapping.  Ask nicely and they might direct you to their stash of bee pollen.

It was a decent chunk of comb, hand cut and prettily boxed, but unfortunately so delicious that we were unable to stop ourselves gobbling up the whole thing in one sitting, one sliver at a time, with a loaf of sourdough.  Heaven.

If you're passing their way on the last Saturday of the month, I highly recommend that you pop in for a visit. They're extremely friendly and patient - and didn't seem to mind explaining to me where honey came from...

-----

The London Honey Company
Open studio at Maltby Street on the last Saturday of the month
54-58 Tanner Place, 9am-2pm

Wednesday, 2 November 2011

A very Stylist girl


Dry mouth, sweaty palms, and a racing heart. I was perhaps a touch overexcited (and still a little breathless!) to see one of my recipes in Stylist magazine today. My Wednesday morning always includes a copy en route to work, collected outside Charing Cross station and then squirreled away until I can digest each page properly on the journey home.

This week marks their 100th issue, which you might reasonably assume would be marked by champagne and cupcakes in the Stylist office. Instead they bravely chose to hand over the reins to their 400,000+ readership, who have designed, written, styled and illustrated every page. And I'm one of them!

I spent a very girlie Saturday morning a few weeks ago with Katie and Mariam, the other Issue 100 cooks, playing with the whizzy kitchen gadgets in the Meile showroom near Oxford Circus while we cooked the dishes to be photographed. The very talented photographer who took the photo above is Nato Welton, who more than did justice to our creations.

Check out the spread here on the website, or have a peek at page 63 if you have the good-old-fashioned hardcopy.

Sunday, 30 October 2011

Fig and feta tart with pomegranate molasses and thyme


Figs and feta are a classic combo. Salty, tangy cheese is the perfect foil to the almost jammy sweetness of the figs after they've melted a little in the heat of the oven.

I meant to make itsy-bitsy versions of this as canapes for a dinner I threw last night, but time got away from me. Very annoying as I know these flavours are a favourite of a friend who was there. So today it was resurrected as a voluptuous dish for Sunday lunch. I can live with that.

FIG AND FETA TART
Serves 6 for lunch

375 puff pastry
1 tbsp olive oil
8 ripe figs
160g feta, crumbled
2 tbsp hemp seeds
2 tbsp pomegranate molasses
10 sprigs of fresh thyme
black pepper

1) Roll out the pastry into a 5mm thick rectangle measuring roughly 9" x 14", then trim the edges with a sharp knife to neaten. Brush all over with the olive oil, then score a line 8mm in from the edges to create a border. Don't cut all the way through when you do this though, just about halfway. Transfer the pastry onto an oiled and floured baking tray.

2) Cut a deep cross into the figs from the stem down, leaving a part of the flesh attached at the bottom. Press out with your fingers to splay the quarters out, then arrange over the pastry.

3) Brush the figs with the pomegranate molasses, then scatter over the feta and half of the thyme. Season with black pepper and pop into the oven at 400f/200c/gas mark 6 for 10 minutes. At this point, scatter over the hemp seeds, then bake for a further 15-20 minutes, until golden and crisp. Serve warm with a leafy salad.

Friday, 28 October 2011

Going conkers for chestnuts


I've been humming Christmas songs to myself all week, which I guess means the festive season has well and truly started. Selfridges opened their Christmas shop in August this year, so I figure that I am now fashionably late to the party.

Thanks to Amber for bringing this wonderful, but not entirely necessary, chestnut roasting pan by Hunter Gatherer to my attention.

Not since the woolley stocking has an object so captivated my seasonal imagination: can't you just picture yourself sitting in front of a roaring log fire with the scent of roasting chestnuts filling the room...? Bliss.

Wednesday, 26 October 2011

The early bird catches the noisette


We had another early morning trip to Billingsgate market this weekend - up at 5am and eyeing up fish by 7. Despite a considerable amount of grumbling (me), we found the energy to get to London Bridge on the way home for some much-needed caffeine at Monmouth Coffee on Maltby Street and to pick up some rainbow chard at Borough Market. Aren't the colours just beautiful?!

My bleary-eyed friend was keen to flex his filleting muscles so we chose a huge whole salmon, to be separated later into a large side for gravadlax, a few greedy-sized fillets, and noisettes, which I used here.

The salmon noisette is a cut which comes from another era, when things were done with care and attention, probably whilst wearing a pinny...and when there weren't so many pleasant distractions like the internet. It's not a quick job, so if you try it, leave yourself plenty of time. The Leith's Fish Bible is excellent for a whole range of basic fishmongery, and it's their instructions that we followed to make these tidy parcels. All you need is a huge fish, the sharpest of knives, a ball of string and a steady hand...

CHINESE-STYLE SALMON PARCELS WITH RAINBOW CHARD

Serves 2

2 x 250g salmon noisettes (or fillets)
2 spring onions, sliced at an angle
1 tsp fresh ginger, sliced into fine matchsticks
1 fresh red chilli, finely sliced
1 clove garlic, finely chopped
2 tbsp soy sauce
½ tsp sesame oil
300g rainbow chard
Steamed jasmine rice, to serve

1) First prep the rainbow chard by washing, then trimming the ends and cutting the chard into short lengths. Place in a saucepan which has a lid, with two tablespoons of water. Set aside to cook later.

2) Now lay out two 40cm square sheets of greaseproof paper and place a piece of salmon onto each. Divide all the other ingredientsequally between the fish and scatter over, then fold the paper over to completely seal in the fish and fasten with string. Bake at 400f/200c/gas mark 6 for 10-12 minutes (the longer time if your fish is a thick piece, or shorter if thin).

3) Five minutes before the fish is cooked, steam the chard over a medium heat until tender, season lightly and serve with the fish and rice.

Friday, 21 October 2011

Applicious


Sweet crocheted apple jackets by Mollie Makes to celebrate National Apple Day! If only I had the time (and the skill...and the patience...)

Wednesday, 19 October 2011

Eat drink and be merry

Image courtesy: Bompas & Parr

Like playing with your food? The Experimental Food Society is having its annual Society Spectacular this weekend. The schedule is frustratingly fuzzy but the two day event promises to feature dining conceptualists, cake sculptors, food landscape artists and food magicians culminating in a banquet finale.

Exhibitors include the jellymongers extraordinaire Bompas & Parr, whose work has raised the former kiddy party ingredient up to near mystical status, crossing the food/art barrier. To top it all off, there's a Bacchanalian nosh-up to close the event on Sunday night.

I've developed an unusually strong interest in camels recently - Camel Conference at SOAS anybody? (it's a work thing), so I'm looking forward to the screening of Hot Chocolate for Bedouins, following one woman's quest to make the supposedly impossible camel-milk cheese (a bit like brie, apparently). Might be tricky convincing someone to join me for that one though...

-----

Experimental Food Society Spectacular: Exhibition, Friday 21st October 13:00-18:00 & Saturday 22nd October 11:00-18:00
Location: The Truman Brewery, Dray Walk Gallery, Shop 14 and F Block B4
91 Brick Lane, London E1 6QL.

Experimental Food Society Spectacular: Banquet, Sunday 23rd October 19:00-23:00
Location: The Folly, 41 Gracechurch Street, London, EC3V 0BT


Monday, 17 October 2011

Guilty pleasures


I've had a cook's blowtorch lurking at the back of my cupboard since my last birthday. Every now and then I feel a pang of remorse as I remember that I should really have tried using it a long, long time ago. What a bad person I must be to have ignored it for so long. Tut.

Well this week I made amends, and in glorious Italian style! These little beauties were dreamt up purely as an excuse to try out my new(ish) toy, and although it does take some practice to get the hang of directing the flame, it is deeply satisfying to produce a rich, burnished finish on the meringue. And as a wonderful by-product, the kitchen smells like honeycomb.

For any newbies to Italian meringue, it involves all the same ingredients as a French meringue, but the sugar is made into a hot syrup which cooks the egg whites without the need to bake it. Magic.

LEMON MERINGUE CUPCAKES
Makes a dozen cakes

~for the lemon cakes:
150g soft butter
150g caster sugar
175g self-raising flour
½ tsp baking powder
3 medium eggs
1 lemon, rind removed with a peeler and flesh juiced
4 tbsp milk
6 tbsp lemon curd

~for the Italian meringue:
120g egg whites (about 4 large egg whites)
210g caster sugar
a small pinch of cream of tartar
75ml water
a sugar thermometer
a culinary blowtorch (optional)

1) First makes the cakes by creaming the butter and sugar together with a hand whisk, until light and creamy. Whisk in the eggs one by one, stir in the milk, and stir in the sifted flour and baking powder. 

2) Chop the lemon rind very finely and add to the mixture with the lemon juice, stirring in well.  Divide between 12 cupcakes cases, and bake at 350f/180c/gas mark 4 for 20-25 minutes, checking to see if a toothpick comes out clean after 20 minutes.  Leave to cool, then scoop out a heaped teaspoon from the top of each cake, and fill with half a tablespoon of the lemon curd.

3) To make the meringue, whisk the egg whites until they form soft peaks, then set aside for a moment. Stir the sugar into the water to dissolve, then heat in a small saucepan until it reaches soft ball stage (120c). Now pour the syrup into the egg whites in a thin, constant stream, whisking the eggs whites at the same time.  It's helpful to have someone else to pour in the syrup while you whisk.  Keep whisking until all of the syrup is incorporated, then whisk for a further two minutes. Spoon the meringue into a piping bag with a wide, round nozzle, and pipe onto the cakes. Use a blowtorch to lightly brown the meringue, carefully avoiding the paper cases.

Thursday, 6 October 2011

Lunchbox lover


A vibrant, healthy salad that you can pile high on the lunch plate without a trace of guilt.

At this time of year, warm salads have the right transitional feel for the will-it won't-it weather. I'm a sucker for the seductive, silky texture that butternut squash takes on after slow roasting, and it makes for a lively mouthful when combined with the crunchy cashews and slippery cous cous here.

I probably overuse this combination of herbs and spices - it works equally well sprinkled over potato wedges - but I just can't resist the herby heat it lends the whole shebang.

WARM COUS COUS AND ROASTED BUTTERNUT SQUASH WITH FENNEL, ROSEMARY AND CHILLI
Serves 4 for lunch

150g Israeli (giant) wholewheat cous cous
10g butter
400ml vegetable stock
a 2lb butternut squash, peeled and cut into 2cm chunks
2 tbsp olive oil
100g cashew nuts
1 tsp chilli flakes
2 tsp fennel seeds
2 tsp dried rosemary
80g rocket (arugula)
¼ tsp salt
½ tsp ground black pepper

1) Stir together the butternut squash in the olive oil, fennel seeds, chilli, rosemary, salt and pepper, and roast in a deep tray for 30 minutes at 400f/200c/gas mark 6. At this point, add the cashews, toss them around in the oil a bit, then roast for another 10 minutes, then leave to cool.

2) Melt the butter in a medium sized pan, add the cous cous and toast until golden, stirring frequently. Add 350ml of the stock and leave to simmer with a lid on for 5 minutes, until it has absorbed all the liquid and is just soft through. Add more of the stock if it dries out too quickly.

3) Toss the roasted squash, cashews, cous cous and rocket leaves together while still warm.

Prepare ahead: The rocket and cashews tend to lose their crunch if added too early so if this is going in your lunchbox, roast the cashews separately and pack them aside from the main bit and then toss together just before eating.  Try adding feta cheese as well for extra substance.

Sunday, 2 October 2011

Ferran Adrià’s weekend food


I have to admit to being rather intrigued by the recipe for a crisp omelette in yesterday's Times magazine by Ferran Adrià (head chef of the legendary El Bulli restaurant in Spain). I had a bit of a food snob reaction to it at first - snack food cooked into an omelette, yeurgh! But the more I think about it the more rational it seems - a lighthearted play on the traditional Spanish omelette of onions and potato perhaps?

I'll have to try it. If you fancy a go, the recipe (though not from the Times, they are quite militant about retaining intellectual rights online!) can be found here on the Food and Wine website.

Saturday, 24 September 2011

Golden oldie


This makes a delectable slice, full of those lovely moist, sticky bits that you only get with a fruit based cake. But I can't pretend that this is the most revolutionary recipe in the world - a friend told me today that banana cake was her favourite because "it's so comforting, like mum used to make". I think that's the point actually. Eating banana cake is like being a kid again, the food equivalent of being wrapped up in a warm, fluffy towel as your mum dries your hair. Supremely comforting.

The bananas need to be truly ripe for this cake, on the verge of corruption into a fruit fly's dinner - spotted and fragrant. I recommend taking them into work on a Monday morning with every good intention of eating them, then slinking guiltily home to make this cake on a Friday evening. Worked for me.

STICKY TOFFEE BANANA CAKE

200g golden caster sugar
50g soft brown sugar
300g ripe banana (about 3 smallish ones), cut into 1cm chunks
2 tsp vanilla extract
150g plus 2 tbsp soft butter
3 medium eggs
175g plain flour
50g rye flour (wholemeal would do)
1 tsp ground cinnamon
¼ of a whole nutmeg, finely grated
a very small pinch of ground cloves
2 tsp baking powder
½ tsp bicarbonate of soda

1) Mix the two sugars together then place 150g into a saucepan with 25ml of cold water, and slowly heat up until the mixture is bubbling and starts to turn a darker colour. Add the bananas, and cook, stirring frequently, until the bananas have broken down and there are no large pieces left. This should take about 5 minutes. Once cooked, stir in the 2 tablespoons of butter and the vanilla, and set aside to cool.

2) Butter a 1lb loaf tin (size approx:25x11x6cm) and line the base with greaseproof paper.

3) Beat the remaining sugar and butter together until they have turned light and fluffy, about 5 minutes. Then whisk in the eggs one by one, and stir in the cooled banana mixture. Sieve the flours, spices, baking powder and bicarbonate together, and fold gently but thoroughly into the egg mixture.

4) Spoon into the loaf tin and bake at 350f/180c/gas mark 4 for 50-60 minutes, until a metal skewer can be inserted and comes out clean. You may need to cover the top with tin foil after about 35 minutes to prevent it colouring too much.

Tuesday, 20 September 2011

Eat me drink me


I felt equal parts disturbed and fascinated to see this perfect replica of a baby at the V&A's new show, The Power of Making.

Made from cake, marzipan and icing by Sussex maker Michelle Wibowo, it is a captivating object of craft that strangely repels and attracts in equal measures.

It reminded me of the pink lipstick-smudged aunts who insisted on kissing both my cheeks when I was a little girl, because "you're so pretty I could eat you all up!".

Monday, 19 September 2011

Prawn, fennel and feta fritters with spicy tomato sauce


In the last two weeks, I've swung from craving hot, stodgy comfort foods (on the cold, drizzly wind-swept days) to thirst-quenching, al-fresco meals (in those strange moments when the clouds part, a choir sings and the sun blazes out for a few precious hours). Frankly, I'm exhausted with all this "is it Summer or is it Autumn?" menu planning, so I'm just gonna eat whatever I like. No more eating with the seasons until they make up their mind.

These fritters are nicely crisp and packed with umami moreishness, so satisfy my winter-cravings, but can be lightened up and served with a summery salad on the side if you like. Dual-personality food cravings fixed!

I used some of my treasured Black Russian tomatoes for the sauce to accompany this dish - if you don't grow your own, try to find properly ripe specimens or the sauce won't pack the required sun-filled punch.

PRAWN, FENNEL AND FETA FRITTERS WITH SPICY TOMATO SAUCE
Serves 4 as a starter

~for the fritters
1 bulb fennel (about 200g in weight), halved lengthways then very finely sliced
1 tsp olive oil
225g raw prawns
100g feta cubes, crumbled
2 tbsp rice flour
3 tbsp corn flour
2 eggs
½ tsp fennel seeds
2 tsp finely chopped chives
Vegetable oil for shallow frying

~for the sauce
325g fresh tomatoes, diced
8 tbsp passata
1 clove garlic, finely chopped
1 fresh red chilli, finely chopped, seeds included
salt and pepper
1 tbsp olive oil

1) Take the finely sliced fennel and sautee in 1 teaspoon of olive oil for five minutes, until softened through.

2) Now make the tomato sauce by heating the remaining tablespoon of olive oil, then gently frying the garlic and chilli for a minute until the garlic is just starting to turn golden. Add the tomatoes, passata and 100g of the cooked fennel and allow to simmer for twenty minutes, then season to taste with salt and pepper.

3) To make the fritters, stir together the feta, raw prawns, rice and corn flour, egg yolks and remaining fennel. Whisk the egg whites until they reach stiff peaks, then gently fold into the prawn mixture with the chives and fennel seeds.

4) Fill a non-stick frying pan 0.5cm deep with vegetable oil, and heat over a medium heat. Cook heaped tablespoons of the mixture for 2 minutes on each side, until golden brown, then flip over and repeat on the other side. Drain on kitchen paper and serve immediately with the tomato sauce.

Tuesday, 13 September 2011

Warm green salad


The last remnants of summer in a bowl. This is the lean, green embodiment of the best of the vegetable patch - not mine though sadly, that moment has passed. Although the days are getting cooler and the mornings have a distinct nip in the air, my local shops and markets are still packed with crisp beans and leaves just crying out to be gently coaxed into a warm salad.

This dish has a sharp edge from the lemon and capers, so buddies up well with pan-fried fish, perhaps some crisp skinned sea bass or a silky piece of salmon. I've been eating it with a creamy scoop of potato dauphinoise on the side, made with some of the waxy Duke of York potatoes that I dug up a few weeks ago and now live in a dark cupboard under the stairs.

A WARM SALAD OF GREEN VEGETABLES AND SALSA VERDE

125g sugarsnap peas
125g green beans
1 large courgette, cut into 5mm slices
50g watercress

~for the salsa verde:
5 tbsp flat-leaf parsley leaves
3 tbsp mint leaves
6 preserved anchovy fillets
3 tbsp capers
1 fat clove of garlic
1 tbsp dijon mustard
the juice of ½ lemon
120ml/4fl oz of extra virgin olive oil

1) Heat two tablespoons of the oil in a deep frying pan and saute the courgette and green beans for a few minutes before adding the sugarsnap peas. Continue to cook for a couple of minutes longer, then add a few tablespoons of water, and pop on a lid to allow the vegetables to steam. Cook until the courgettes are cooked through, about five minutes. Now set them aside while you make the sauce.

2) Very finely chop the parsley, mint, capers, anchovies and garlic until they almost form a paste, then place in a bowl and stir in the mustard, lemon juice and olive oil. Taste, and add seasoning if necessary but the anchovies will be salty so you may not need to.

3) Now gently toss the warm, cooked vegetables with the watercress and sauce, and serve immediately.

Friday, 9 September 2011

Chocolate and almond brioche buns


These were supposed to be for a girlie Sunday breakfast, but my brunch buddy got horribly drunk the night before and we were forced to resort to a full English as an emergency measure. One plate of eggs, bacon, sausage, beans and grilled tomato later, and she was considerably perkier. And we still managed to finish a couple of these in the afternoon. Result.

CHOCOLATE AND SOFT MARZIPAN FILLED BRIOCHE BUNS
Makes 16 small buns

~for the marzipan
80g caster sugar
80g icing sugar , plus extra for dusting
125g ground almonds
grated zest of 1 lemon or 1 orange
1 egg

~for the brioche
400g white bread flour
50g golden caster sugar
1 packet fast action yeast (7g)
1 tsp fine grain salt
4 eggs,and 3 egg yolks
250g room-temperature butter

plus, 16 small cubes of dark chocolate (70% cocoa solids), about 75g altogether
1 tablespoon of flaked almonds (optional)
and a beaten egg to glaze
16 pieces of greaseproof paper, each 12cm square

1) Warm the milk until it is lukewarm - not too hot - then stir in the yeast and a heaped tablespoon of the flour. Leave the mixture for half an hour until it is bubbling to activate the yeast.

2) Stir the eggs, salt and sugar into the yeast mixture, then stir in the rest of the flour. It will be wet, but don't worry, it is right! Now leave it for another half hour, then find a nice clean surface to knead in the soft butter.

3) Pop the dough onto the surface, and use your hands to spread in small amounts (about 1 tablespoon). You will need to spread the butter over the dough then fold it in repeatedly, stretching the dough as you go. Add more butter when the first bit has been amalgamated into the dough. Continue to add the butter, spreading and then gathering the dough over and over, until all the butter is incorporated. This should take about ten minutes, and the dough should have a little bit of spring-back when you press a finger into its surface. It won't be as springy as normal bread dough though. Chill for a few hours.

4) Meanwhile, make the marzipan by sifting the two sugars and ground almonds together, then stirring in the orange zest and egg. Roll into 16 equal balls and set aside. Now take the dough and separate into 16 evenly sized balls (weigh them if you need to), poking a ball of marzipan and a piece of chocolate inside each.

5) Tuck the paper squares firmly into deep muffin tins, folding them to fit where necessary, then drop one brioche bun into each. Leave to rise until doubled in size (about an hour in a warm room), then brush each one carefully (so as not to spoil the rise) with a liberal amount of beatan egg and sprinkle with flaked almonds. Bake at 375f/190c/gas mark 5 for 18-20 minutes on the bottom shelf of the oven, until golden.

Prepare ahead: If you don't want to eat all of these in one go, you can freeze them after step 4. They will need a longer rise when you take them out of the freezer, so pop them into the paper cases the night before you want them and they will be risen by the morning.

Monday, 5 September 2011

Barley risotto with mushrooms, leeks and roasted garlic


Autumn is here. The first signs came with the sweet scent of mulching leaves and the golden early morning sun last week. A couple of the smaller, over ripe tomatoes have started to rot on the vine, and we’ve just switched the central heating back on.

The summer had its last hurrah over the weekend, one last splash of hazy warmth before the rain sets in proper. I was overjoyed to see my huge and beautiful Black Russian tomatoes take on a deep burgundy hue as they sunbathed. In my mind they had already been consigned to a batch of green tomato chutney.

I’m craving something more comforting than the leaf salads that have been my suppers over the last few months, and this pearl barley risotto neatly fits the bill. Not quite the stodge of a pile of mashed potato but warming none the less. The barley gives this a more toothsome bite than rice and doesn’t demand that you spend hours ladling and stirring – the liquid can all be added at once. A lazy risotto then, but still delicious.

PEARL BARLEY RISOTTO WITH MUSHROOMS, LEEKS AND ROASTED GARLIC
Serves 2

2 whole heads of garlic, cloves separated, skin on
4 tbsp extra virgin olive oil
15g butter
1 tsp picked fresh thyme
½ small leek (white part only), finely chopped
150g mixed mushrooms (perhaps shitake, enoki, chanterelles or porcini), sliced
200g pearl barley, well rinsed in cold water and drained
800ml vegetable stock
2 tbsp mascarpone
25g parmesan, grated
Freshly ground black pepper
To decorate: micro leaf garlic chives (optional)

1) Toss the garlic cloves in a tablespoon of the olive oil and place in a shallow ovenproof dish. Bake for 25 minutes at 375f/190c/gas mark 5, then leave to cool. Slip each clove out of its papery sleeve and roughly chop.

2) Meanwhile, take two more tablespoons of the oil and fry the mushrooms in a large frying pan until golden brown, then set aside.

3) Using the same pan, heat the butter and the last of the oil and fry the leeks over a medium heat until they are soft and translucent. Add the pearl barley, thyme, garlic and stock, and leave to simmer for about 20-30 minutes, until the barley is soft but still has a little bite in the centre. If the pan runs dry, add a little more water. Once cooked, stir in the mushrooms, parmesan and mascarpone, and season with a little black pepper.

Friday, 2 September 2011

Blooming marvellous


Something for the weekend. This Saturday will see edible gardens across the capital opening their doors for chance to taste the local produce, learn about urban food growing, or just to have a general nosey about. I'm intrigued by the Floating Allotment in Hackney...

If you're feeling particularly energetic there will be a free guided cycling tour of some of the sites in the North/East of London. The forecast for this weekend: a (relatively) scorching 26 degrees!

Capital Growth Edible Gardens Day
3rd September, 2011
Various locations around London

Friday, 26 August 2011

The inside scoop


It's time to cut out the middle man. No more waiting in line for the perfect scoop - I am now the proud owner of an ice cream maker, able to whip up a batch of whatever eccentric frozen treat I might dare to dream of.

With my garden now brimming with luscious herbs, I will be trying thyme, basil and lavender versions as I work my way along the modern-classic route of herby ices. But first I wanted to go back to basics and try a golden oldie.

If you've never tried brown bread ice cream it might sound a little strange, but there's something about the combination of perfectly smooth, creamy vanilla ice cream rubbing up against those crisp, caramelised breadcrumbs that makes my mouth water. It's a textural thing. We've precious little summer left, so I intend to savour every last moment, one scoop at a time.

BROWN BREAD ICE CREAM

Makes about 850ml

~for the ice cream
300ml double cream
285ml whole milk
60g caster sugar
1 tsp vanilla extract
4 egg yolks

~for the breadcrumbs
90g rough breadcrumbs, preferably made with 100% brown bread flour
60g light brown sugar
60g butter

1) The day before you want to make the ice cream, pop the bowl into the freezer and have some ice cubes ready.

2) To make the vanilla ice cream: place the cream and milk into a saucepan and warm. Meanwhile, whisk the egg yolks in a large bowl with the sugar until thick enough to leave a ribbon trail. When the cream mixture is blood temperature, whisk a quarter of it into the egg yolks, and bring the rest to the boil. Bring the rest of the milk to the boil, then whisk into the cream mixture.

3) Transfer the mixture to the pan and heat, stirring continuously, until it thickens enough to coat the back of a spoon. Don't let it boil or it will curdle. Now plunge the base of the pan into a large bowl of super cold iced water until it is completely cold, then stir in the vanilla. Churn in an ice cream maker until frozen, about 30-45 minutes.

4) While the ice cream is churning, make the caramelised bread crumbs by melting the brown sugar and butter in a pan until they are well combined and have a sauce-like appearance. Stir in the breadscrumbs then scatter the crumbs evenly over a large baking tray and bake at 350f/180c/gas mark 4 for about 25-35 minutes, or until very crisp all the way through. Allow to cool, then fold half of the crumbs into the ice cream. Freeze for at least a couple of hours before serving, then sprinkle over some extra crumbs before scooping out.

Thursday, 18 August 2011

Ice cream for stormy weather

photos: © Dezeen Limited

Well it's certainly not ice cream weather here in London this week. I'm already regretting the decision to bare my legs today and I haven't even made the journey home yet.  Bah!

On the bright side, I think I've found the perfect place to indulge on a wet and windy day. Polka Gelato is new (and therefore bright and shiny), within handy cone-licking distance of my office in Bloomsbury, and has a slightly sombre, monochrome interior which won't upset my sun-starved eyes. All very welcome things on a dour day.

Go forth and lick! I'll race you.

Thursday, 11 August 2011

Crab tart and a much needed glass of wine


I won’t lie - I love crab, so I relish it in any form. Though it's wonderful simply dressed with lemon or gobbled up with a smudge of homemade mayonnaise, I was feeling adventurous this week and so came up with this Asian inspired tart with sesame oil and chilli. It’s a quick thing to make, which leaves more time to relax in the garden with a warm slice and a glass of wine. And after the week we've had here in London, I can tell you I need that glass of wine...

I only used the sweet white crab for this dish but if you want to use the brown meat too, spread it over the base of the tart before adding the rest of the filling.

FRESH CRAB, SESAME AND RED CHILLI TART

~for the pastry:
125g (1 cup, loosely packed) plain flour
A pinch of salt
55g butter
Cold water
1 egg white

~for the filling:
3 eggs and 1 egg yolk
225ml milk
150ml double cream
250g white crab meat
2 tbsp finely chopped chives
1 fresh, mild red chilli, finely chopped
1/8 tsp sesame oil
2 tsp sesame seeds

1)First make the pastry by rubbing the flour, salt and butter together with your fingertips until the mixture resembles fine breadcrumbs. Slowly add cold water, one tablespoon at a time, until a dough forms, then chill for half an hour. Roll out to a thickness of 3mm, and use to line a greased 20cm x 3cm loose bottomed tin. Trim the excess pastry and prick the base all over with a fork.

2)Line the tin with greaseproof paper and fill with baking beans, then bake at 20 minutes at 350f/180c/gas mark 4. Remove the beans, and bake for a further 5 minutes, then brush the tart case with egg white and bake for 2 further minutes before leaving to cool.

3)To make the filling, whisk the remaining eggs, cream, milk and sesame oil together with plenty of black pepper and a little salt, then stir in the crab, chives and chilli before pouring into the pastry case. Sprinkle the top with the sesame seeds and bake for 35-45 minutes, until the centre is set but still a tiny bit wobbly. Allow to cool and heat warm or cold.

Friday, 5 August 2011

A warm salad for a warm week


These sun-dried cherry tomatoes were a new Venice find. My first taste didn’t disappoint - they were lush and flavoursome. And my new snacking vice.

The first pioneering yellow cherry tomatoes blossomed to full sweetness in the garden this week, and would be a tasty addition to this salad. But I still think the first tomatoes should be eaten right there as they’re picked, still warm and fragrant from the sun. I love summer.

BELUGA LENTIL SALAD WITH CHERRY TOMATOES AND GOAT'S CHEESE

200g Beluga (or Puy) lentils
1 litre vegetable stock
150g mild, soft goat’s cheese
100g sun-dried cherry tomatoes
a whole fresh red chilli, finely chopped (seeds removed)
a large bunch of chives, chopped
3 tbsp extra virgin olive oil
the juice of half a lemon
salt and pepper

1)Simmer the lentils in the vegetable stock for 12-15 minutes, until tender, then drain and leave to cool a little.

2)Dice the cheese into 1cm pieces and stir into the warm lentils with the cherry tomatoes, chives, and chilli. Squeeze over the lemon juice and pour over the oil, then season with lots of pepper and a little salt.

3)Serve warm, or room temperature – but definitely not cold.

Tuesday, 2 August 2011

Urban style


I’m loving the new season of kitschy home wares at Urban Outfitters, especially these Bird Salt & Pepper shakers and set of Regency Cake Tins. It’s almost enough to make me start my Christmas shopping a mere five months early. Almost.

Thursday, 28 July 2011

Stuffed sardines with preserved lemon and pine nuts


There was a particularly nimble fingered woman in the Rialto fish market who could bone and clean a sardine with her bare hands in under twenty seconds.

Impressive stuff, but when it came to handing over my euros the sardines lost out to the more alluring swordfish and crayfish on offer. There was a moment of regret when I realised that I wouldn’t be able to fit any more into my overspilling bags, so I made this dish almost as soon as we landed, to make amends.

For this, all you need is spanking fresh fish and the rest will take care of itself. It wasn’t intended for the barbecue but a row of these would be extremely good lined up on the grill for outdoor eating, perhaps with a simple red onion, tomato and herb salad.

STUFFED SARDINES WITH PRESERVED LEMON AND PINE NUTS
Serves 2

6 whole large sardines, gutted, washed and dried
3 preserved lemons, chopped
25g (½ cup) dried breadcrumbs
3 tbsp toasted pine nuts
¼ tsp coarsely ground black pepper
4 tbsp chopped parsley

1) Mix together all the ingredients except the sardines, then divide equally between the fish. Stuff the belly cavities quite full with the breadcrumb stuffing, then use a wooden barbecue skewer to sew the fish closed, by weaving once or twice through the body from the tail end to the head end. This will also help the fish stay intact while it’s cooking.

2) Cook the sardines under a very hot grill, or barbecue, for 3 minutes on each side, until the fish is juicy and the skin slightly blackened.

Wednesday, 27 July 2011

The scent of ripe peaches


Ciao bella! Ah, is there anything quite as bitter sweet as the first day back at work after a holiday? Such delicious memories to think back on, but all over…

*Sigh*

Well, as expected I ate too much but if you saw the seafood in the Rialto Fish Market then you’d judge a little less harshly. Plus I had the hunkiest fishmonger EVER (see photo above).

Venice may be a small city but it is spectacular: we stumbled across a dazzling firework display for the Festa del Redentore on our second night, a festival to give thanks for deliverance from the plague; a very Venetian interpretation of an age old (and slightly grim) tradition in spectacular modern style.

A happy week encompassed meals of uber fresh fish, drinking bright orange Prosecco spritzes “con Aperol” as we lazed in the afternoon sun, browsing the highbrow culture and lowering the tone by schmooching on every bridge.

There is a tradition for couples in Venice to add a padlock to a bridge, etched with their names. I guess it’s to do with marking something, somewhere, as a permanent reminder. We added ours too, and it makes me smile to think of it there.

My highlights: the tiny tapas-like cicheti served in Al Portego near the Rialto bridge, and Al Bottegan in Dorsoduro, where you can watch the last remaining gondola workshop beavering away as you lazily sip a glass of something frosty. And the fact that every street has a gelato shop, and all with ice cream to die for. More on that later.

The Rialto fish market was packed with exciting produce (snails, argh!) but it was the small canal boats selling fruit and vegetables that really tickled me. I passed one moored to the Ponte dei Pugni bridge just off from the Campo Santa Margherita where the air was thick with the scent of ripe peaches, so juicy that they ran down to our elbows as we ate them.

I never quite managed the cicheti crawl through Venice. The lure of a refreshing glass of something was always far more tempting but that just leaves me something for the next visit. Roll on 2013.

Thursday, 14 July 2011

Ciao bella!


Finally! For one glorious week I will be leaving London for the sunny shores of Italy. I'm off tomorrow for my bi-annual trip to the Venice Biennale to see what the contemporary art world has been up to since I allowed it to slip down the back of the sofa in 2009.

As always, I will be travelling firstly for my devotion to culture (cue halo), with the continuous rumble of my stomach coming a very close second in deciding how I spend my days. This trip will bring my first cicchetti crawl – a thorough interrogation of the many bàcari (bars) that litter the backstreets of Venice, away from the burger joints and tourist traps of San Marco square. Hopefully I will be able to recommend a few gems when I return. Till then, enjoy the sun wherever you are – happy holidays!

Wednesday, 6 July 2011

A fine romance


Yesterday, I fell in love in Paris. No, not with a dashing Gallic man with flashing eyes and tousled locks. Of course I fell for the food, namely some stand-out fabulous patisserie.

I was in Paris for a meeting (a one-off moment of glamour in my otherwise London-based life!) which catered for our lunch from "a little bakery down the road". Of course when you work in Paris it is normal to have an historic patisserie next door, naturellement? And so we were treated to simply the most incredible spread of charlottes, macarons, tarts, mille feuille and other sweet concoctions that I've ever seen, courtesy of Pâtisserie Stohrer on Rue Montorgueil.

Since it doesn't do to eat more than one dessert at a work meeting (honestly, it broke my heart) I made my choice carefully: just one, but my god it was delicious. A crisp, buttery pastry tart base filled with pistachio mousse and topped with fat, glistening strawberries. It makes my mouth water even now to think about it.

If you're ever in Paris, I urge you to seek out this place. Go with an empty stomach and leave a few pounds heavier but very, very content.

___________________________________

Stohrer - pâtissier traiteur

Magasin au 51 rue Montorgueil
75002 Paris
Open 7 days a week, 7:30am to 8:30pm

Sunday, 3 July 2011

Tart with a heart


If ever there were a tart with a heart it would be this one.  If you've only ever had the mass produced versions covered in a thick wedge of icing with a glace cherry on top I would urge you to try this instead, they're worlds apart. 

This is a tart that seems more wholesome than it is because it tastes like a sepia tinted childhood memory that you probably never had - unassailably comforting. I recommend it with a cup of earl grey in the afternoon.

CHERRY BAKEWELL TART
Makes one 25cm tart

~for the pastry:
190g plain flour

35g golden caster sugar
115g butter, cut into cubes
1 medium egg

~for the filling:
6 tbsp cherry jam
225g caster sugar
225g soft butter
225g ground almonds
5 medium eggs
½ tsp almond essence (optional)
the zest of a lemon
2 tbsp flaked almonds

1) First make the pastry by rubbing the butter into the flour with your fingertips until it resembles fine breadcrumbs, then stir in the sugar and the yolk of the egg (saving the white for later), and bring together into a ball. If the mixture feels too dry, add a few drops of milk. Roll out into a rough circle about 20cm round, then cover with clingfilm and chill for 20 minutes.

2) After chilling, roll out again to a thickness of 3mm and use to line a buttered and base lined 25cm x 3.5cm loose bottomed tin. Leave 1cm of additional pastry around the edge of the tin, this will be trimmed off more neatly after blind baking. Chill in the freezer for 15 minutes, then prick the base all over with a fork, line the pastry with a piece of greaseproof paper and fill with baking beans before baking for 20 minutes at 350f/180c/gas mark 4. Remove the beans, brush the pastry with the left over egg white, and bake for a further 10 minutes. Then trim the edges down to the height of the tin, and leave to cool.

3) Now spread the cherry jam over the base of the tart, then cream the butter and sugar together until light and fluffy. Beat in the eggs, lemon zest and almond essence then fold in the ground almonds. Spoon into the pastry case, level out, and scatter over the flaked almonds. Bake for a further 20-25 minutes at the same temperature as before until golden on top and set in the centre.

3) Serve cool or slightly warm with thick cream, ice cream or Chantilly cream.