Tuesday, 11 December 2012

Spot the Difference

Left: A 1903 Edward VII penny, defaced by suffragettes.  © The Trustees of the British Museum
Right: Immortalising history.  In cake.

It's not often that I attempt a 'showstopper' cake - expectations are always high, and I don't really go for coloured frostings or those hard little silver balls that break your teeth.  But this was for charity.  And it's Christmas.  Plus, the tie-in with the Great British Bake Off was just too much to resist.

A colleague is running the London marathon this year, and has decided to raise some charitable dosh for Age UK, a very worthy recipient.  Her first fundraising effort was to organise a work bake-sale, tying (in a totally non-affiliated, non-copyright infringing kind of way) into the recent success of the televisual cake-stravaganza which is The Great British Bake Off.  And because we work at the British Museum, of course this became The Great British Museum Bake Off.

Staff were invited to enter three categories: the Signature Bake (tea-time favourites), the Technical Challenge (mince pies), and the Showstopper (a baked product inspired by the British Museum).

Sadly, my effort, a dense fudgey cake covered in chocolate ganache and inspired by A History of the World in 100 Objects was not a winner, but I thought I'd share it with you anyway.  It's based on an Edward VII penny from 1903 which was defaced by militant suffragettes fighting for the vote, a small but expressive gesture against the authorities.  It would have changed hands countless times, spreading its message.  It's a potent object, I love it.  And yesterday, I got to eat it too!

Thursday, 8 November 2012

Playing with food


I'm particularly pleased about sharing this recipe with you because it's one which appears in a new publication!

An illustrator friend invited me to contribute a food column to her just-launched children's newspaper, The LOOP, a quirky broadsheet-style publication which will be released every couple of months.  It caters for 8-13 year olds with hungry minds (as well as stomachs), and won't shy away from asking big or difficult questions about art, politics and life.  And, happily for me, they also wanted a food element.

The trouble is, I'm not really used to cooking for children.  Many of my friends have restricted or specialist diets - give me a nut-allergic, diabetic vegetarian to cook for and I'm excited by the possibilities - but up until now, I've had little experience of what children want.  However, if there's one thing that Junior Masterchef has taught me it's that children have the capability to be adventurous, accomplished cooks. 

I've started with a safe bet - cakes.  And I like the idea of making an unfamiliar subject more understandable, perhaps introducing a new ingredient or technique in each issue.  So this week, tamarind. 

This is a simple recipe which doesn't involve any knives but might need supervision of the oven.  If you don't have a child to help you, try substituting with a friend or partner.

TANGY TAMARIND CUPCAKES WITH CREAMY HONEY FROSTING

Makes 12 cupcakes

Remember to ask your parents for help when using kitchen equipment like the oven, and maybe give them a cake afterwards to say thank you!

Ingredients:

To make the cakes~
125g room temperature butter
125g caster sugar
125g self-raising flour
2 large eggs
5 tablespoons tamarind paste (or you can use lemon juice if you can’t find tamarind)
3 tablespoons milk

To make the creamy topping~
70g room temperature butter
4 tablespoons honey
5 tablespoons cream cheese
175ml double cream

To decorate the cakes~
30g flaked almonds

Instructions:

1) Preheat the oven to 400f/200c/gas mark 6.

2) Put the butter and sugar in a large bowl and whisk until they have turned paler. Now crack in the eggs - be careful not to get any eggshells in - and whisk the mixture until it is smooth. Sift in the flour and fold through, then stir in the tamarind paste and the milk.

3) Now put 12 paper muffin cases into the spaces in a cupcake tin, and divide the cake mixture between the paper cases.  Try and an equal amount in each one if you can so that they all finish baking at the same time.

4) Get an adult to help you put the cakes in the oven, then bake them for 15 minutes until they are golden on top and they have risen. You can test if they are done by poking a toothpick in the middle - if it comes out without any wet cake mixture on it, then they are done.  Take the cakes out of the oven, and leave them to cool.

5) Before you switch off the oven, spread the flaked almonds out on a baking tray, and bake them for 3 minutes, or until they have turned light brown. Then leave them to cool while you make the creamy topping.

6) Put the butter into a clean, large bowl and stir it with a spoon until it is very smooth. Add the cream cheese and the honey and stir until the mixture is smooth again. Pour in the cream, and get a parent to help you use an electric hand whisk to beat the mixture until it has gone thick and spreadable.

7) Spread some topping over the top of each cake with a knife, then finish by sprinkling over the almonds.

Try not to eat them all at once!

Wednesday, 24 October 2012

Fish fingers and salty air


What better way to spend a day than messing about on the sea with er, a fishing rod and a dozen men? 

I've been a bit preoccupied by the onset of Autumn and the incredible spectrum of mushrooms that have popped up over the last few weeks. Too busy to blog about my fishing trip I'm afraid, until now.

I grew up in Brighton so the concept of fishing isn't alien to me, it had just never occurred to me that I might try it. Until I was gently coerced into going on a mackerel fishing trip with my partner that is. See, this is what happens when I let him organise our weekends. 

And so I came to be on a tiny boat in Brighton, bobbing around a mile off the Sussex coast, the sole female and wearing quite unsuitable footwear. Ballet pumps had seemed a reasonable choice that morning, but then I wasn't expecting to be sluiced down with fish water by the afternoon. 

Good points: It was a beautifully clear, sunny day, with barely a whisper of movement on the water. No seasickness then. And we caught some fish. And then some more. And more, and more and more until our bucket was so full we couldn't land any more. Fifty two sparkling eyed young mackerel simply leapt onto our hooks that day, an astonishing catch. 

Bad points: I mentioned the shoes, right? Also, when a fisherman shows you how to get a wriggling, desperate-eyed fish off the hook it looks easy. Trust me when I say it isn't. 

After ninety minutes we had a unfeasibly large bucket fish, and a warm glow of satisfaction from catching line caught mackerel, which should earn me back the foodie brownie points which I recently squandered in a flurry of Vietnamese cooking that cost me dearly in food-miles (why can't they grow lemongrass and galangal in London eh?). 

Those spanking fresh little beauties were a revelation in taste, totally different from what I had come to assume was a 'true' mackerel flavour. Much lighter, less pungent and oily than the more mature fish. We ate the first couple very simply grilled with salt and pepper in soft white buns, with a lightly pickled cucumber salad on the side. Total heaven. The mild flesh also lends well to dishes that I would normally reserve for white fish. The South Indian curry we made for dinner was delicious, using meaty chunks of mackerel to soak up the fragrant spiced sauce. 

If you're interested in trying your hand, pack some wellies or sturdy shoes (and may I suggest a cloth for your fingers, you will end up with fish fingers) and give Watertours a call. They carry on until November, so you have precious weeks left before they pack up again until the Spring.

Thursday, 20 September 2012

Sloe gin summer puddings


Nothing says summer like a sharp-and-sweet fruit pudding so these are something of a last hurrah for the Indian summer that graced our fair city last week, fading so quickly now as the days get shorter. Someone (not me) has switched on the heating in our house, and I have finally been forced to rootle out my leather gloves for that first icy hour on the way to work. 

I made these puds with the last of the blackberries from the back garden, now wilting on the branch and only good for the birds. They’re very forgiving, happy to have pretty much any mix of red berries thrown in according to taste, as long as there’s a good heft of raspberries and sharp blackcurrants.  A certain level of acidity is needed to stop the mixture from becoming cloying, and to act as a foil to the indulgent cream. Cook it while you can, and say goodbye to the summer.  

SLOE GIN SUMMER PUDDINGS
Makes 6
I know a large pudding is more traditional but I just couldn't resist these tiny versions, they're no extra bother to make and turn out nicely on a plate.

800g mixed berries and currants (I used 200g strawberries, 200g raspberries, 150g blackcurrants, 100g blackberries, 150g redcurrants)
8 slices of fresh white bread, no thicker than 8-10mm
3 tbsp sloe gin and 1 tbsp orange juice or water
40g sugar (3 tbsp)
1 tsp vegetable oil
a small jug of thick cream to serve
Six 8x5cm individual pudding tins

1) Strip the redcurrants and blackcurrants from their stems and place in a saucepan with the rest of the fruit, sugar and sloe gin. Pop on a lid and bring the fruit up to a gentle simmer. Allow to bubble for a few minutes, until the fruit has released its juice but still has some shape. Separate the fruit from the juice using a sieve, and set aside to cool.

2) Use the oil to rub inside each pudding mould - it helps the puddings release later. Cut the crusts from the bread and cut out a round to fit in the bottom of each tin. Soak each piece in the juice and press into the pudding tin. Next build up the sides by cutting strips of bread to line the tin, again soaking each one in juice before pressing into the tin. Once all the tins are completely lined, spoon in the fruit mixture, then seal each pudding with a juice-soaked round to close it.

3) Wrap each pudding in a thorough sheet of cling film, then weight each one down (a small tin can/jam jar will do) to help compress the filling. Chill for at least a few hours, or preferably overnight, before serving. If you find the puddings are reluctant to release from their tins, run a knife around the rim first. Serve with indecent lashings of cream.

Saturday, 1 September 2012

Salted cod scotch eggs with smoked paprika and fennel

Apologies for the lengthy silence, I've been on holiday for the last couple of weeks. I did think about my poor blog languishing in the shadows but frankly I was just having too much fun to bother with the boring old interweb.

This was my first attempt at staycationing - instead of venturing abroad, we decided to explore all the wonders on offer pretty much on our doorstep in London. There's an awe inspiring amount to do in our wonderful capital, and I finally got to tick off a few things from my mental list of London-to-dos.

Near the top of the list was taking advantage of the decent weather; a few hours of daily sun for a couple of weeks is a rare commodity right now. And sun means one thing to me - picnics. I love a good spread out in the open air. We ate these on a row boat, bobbing around next to the picturesque bridges on the Thames at Richmond. Fresh air really does make food taste better.

SALTED COD SCOTCH EGGS WITH SMOKED PAPRIKA AND FENNEL
Makes 10
350g boneless, skinless salted cod
2 bay leaves
5 peppercorns
12 medium eggs
200g undyed smoked haddock
2 tbsp olive oil
300g arborio rice
1 medium onion, finely diced
2 cloves garlic, finely diced
2 tbsp butter
1 tsp smoked paprika
¼ tsp cayenne pepper
¼ tsp black pepper
1½ tsp whole fennel seeds
1 litre weak vegetable stock
2½ cups panko breadcrumbs
600ml vegetable oil
1) 24 hours before, submerge the salted cod in cold water, changing the water once during the day. The next day, put two bay leaves and five black peppercorns in a pan with a litre of boiling water, and add the cod. Reduce to a simmer and very gently cook for 5 minutes, or until just starting to flake apart. Drain and remove the bay leaves and peppercorns, leave to cool, and then flake into small pieces.
2) Place 10 of the eggs in a pan of cold water and bring to the boil, then simmer for 5 minutes. Run under cold water to stop them cooking, then carefully peel them and set aside. Grill the haddock under a medium heat for about 8 minutes, or until tender and just cooked through. Leave to cool, and then flake into small pieces.
3) Next heat the olive oil in a large saucepan and add the onion. Cook on a low heat until translucent, about 8 minutes, then add the butter, rice, and garlic. Continue cooking for another 2 minutes, then add the paprika, pepper, cayenne and fennel and half of the stock. Allow to simmer until the stock has been absorbed, stirring occasionally, then add the other half of the stock and continue to cook until it has absorbed all the liquid. When the rice is cooked through, the mixture should be very thick. Stir through the cod and haddock, check if the mixture needs any salt, then divide into 10 blobs.
4) Make a 20x20cm piece of triple thickness clingfilm, then put a blob in the middle of the clingfilm. Flatten the blob slightly, and make a dent in the centre with a spoon, then place an egg in the dent. Use the clingfilm to shape the rice around the egg until nice and round. Repeat with the other eggs.
5) Whisk the remaining eggs in a small bowl, and roll each rice ball first in the egg, then in the breadcrumbs. Make sure each one is really well covered. Dip again into the egg, then breadcrumbs, to double coat. Heat the vegetable oil in a small saucepan to 190c. Cook the eggs one or two at a time for about 3-4 minutes, until golden brown. Drain on kitchen towel and repeat with the other eggs.

Sunday, 22 July 2012

Give peas a chance


A tiny triumph in the garden...

Despite the wind and rain, nature has battled through. Last week saw my first mange tout of the season - Carouby de Maussane - a large podded variety with beautiful violet flowers, which I can now enjoy tossed into soups and stir fries. Many of them don't even make it into the kitchen - the peas are so sweet plucked straight from the vine. Either way, they're a simple luxury which I am quite besotted with.

Monday, 25 June 2012

DIY wasabi crisps


The horror! The Japan Centre no longer stocks my favourite wasabi rice crackers. Sob. I am quite bereft, and no amount of googling has turned up another supplier.

So, I've resorted to making my own eye watering snacks, which almost make up for the loss. Made with seasonal spring greens, these are packed with vitamins and only contain two teaspoons of oil, so I can graze on them through the day, guilt free.

The oven temperature for this may seem long and low, but persevere - think of it more as dehydrating than cooking. You're aiming for unsinged, crisp wafers, so plenty of patience is required.

WASABI GREEN CRISPS

150g spring greens or kale (weight after removing the tough central stalks) about 4 well-packed cups
2 tsp vegetable oil
2 tsp soy sauce
4 tsp powdered wasabi

1) Cut the spring greens into large crisps, about 5x8cm pieces, then wash and thoroughly dry them with a tea towel.

2) Toss the greens in a large bowl with the rest of the ingredients, except one teaspoon of the wasabi powder, then use your hands to make sure that all the leaves are evenly covered with the oil.

3) Spread out evenly in a large roasting tin and bake at 275f / 140c / gas mark 1 for about 90 minutes, stirring through every 20 minutes to ensure they all dry out evenly. Try to keep the leaves flat if possible, so they don't clump together. If they fold over each other you will find that some will not be as crisp as others.

4) When all the leaves are crisp and dried through, allow them to cool before tossing through the remaining wasabi powder, and store in an airtight box.

Sunday, 10 June 2012

Chicken of the woods with HRH wild garlic


Apologies for the deadly silence of late, I've been caught in a frenzy of what-to-wear? brought on by those summer events that demand something shiny and new.  Does it really take that long to pull together a few outfits for a couple of weddings and a festival you may very sensibly ask... Yes, if like me you are stricken with the indecisive gene.  Plus, the weather hasn't been very forgiving recently so my summer frocks need buddying up with something more sensible for the foreseeable future.  Anyway, crisis over, frocks found, and the world has been put to rights again.

Back when I still had free time, I was foraging again with the boy and struck gold - mushroom gold!  Chicken of the woods is supposedly quite common in the UK but had previously eluded me.  If you've not seen it before, it's a bracket fungus that grows off deciduous trees like oak in clustered plates, in the most incredible vibrant sulphur yellow that just shines out from the tree when you spot it.  It is like finding treasure!

I'm afraid I was too eager to tuck into our bounty so totally forgot to take a good picture of it before we chopped it up, but you can see the brilliant colours and marbling in the first photo above.  Beautiful.

Since it was our first time eating COTW we cooked it very simply, in butter with a little sea salt, until it was crispy at the edges and had turned an even deeper shade of orange.  And oh. My. God.  It was ridiculously delicious.  I wasn't sure if the name would ring true, but it really does taste like chicken, in the sense that it's rich, deeply flavoured and firm textured.  It's like the chicken that I remember from when I was little.  Essence of chicken.  Partnered with a poached egg and some pan fried wild garlic (foraged also, from the grounds of a Royal Palace no less!) and spinach, it made the perfect toast topping to start the day.

Wednesday, 16 May 2012

A new tart for a new season


When will summer start? It's a question that keeps popping up at the moment, probably because of the less than inspiring weather that's plagued us for the last month. No Spring wardrobe, just a continuation of winter woolies, brollies at dawn, and on occasion, wellies to work. Bah.

Well I date the start of summer to the appearance of certain foods, asparagus being one of them. And now that I've eaten some, I hereby christen it summer - ta da! Now if the sun could please come out now?

This recipe combines the thinnest stems of asparagus with the type of lightly smoked salmon that comes in a fillet, unsliced. If you haven't tried it yet, then I'd recommend it for the subtle smokiness it lends. Alongside the fluffiness of the ricotta and zippy lemon zest, this is altogether a bare legs and silk blouse kind of a dish. And almost enough to make me put away the hot water bottle at work.

ASPARAGUS, SALMON, RICOTTA AND LEMON TARTS

Makes 6

~for the pastry cases
180g plain flour
90g soft butter, cut into small pieces
a large pinch of salt
ice cold water
2 medium egg whites

~for the filling
80g of thin stemmed asparagus tips, 6cm in length
130g whole fillet of lightly smoked salmon
80g ricotta
zest of 1 lemon
2 medium egg yolks
100ml double cream
75ml milk
salt and pepper

1) First make the pastry by gently rubbing together the flour, butter and salt until it resembles fine breadcrumbs, then add enough cold water to bring it into a ball. Wrap in clingfilm, and allow to rest for an hour.

2) Butter and flour six loose-bottomed 8cm tart tins, then roll out the pastry to 3mm, and use to line each tin. Leave spare pastry above the rim of each tin to allow for shrinkage while they cook. Pop back in the fridge again for 30 minutes, then line with greaseproof paper, fill with baking beans, and blind bake for 15 minutes at 300f/150c/gas mark 2. Remove the paper and beans, brush each case inside with the egg white, and bake for another 5 minutes. When the cases are cool enough to handle, trim down the surplus pastry with a small, sharp knife.

3) Prepare the asparagus by blanching it in boiling water for 2 minutes, then divide between the pastry cases. Slice the salmon fillet into 12 slices, and add two to each case. Dot the cases with ricotta, and zest the lemon over the tart cases. Whisk the egg yolks, cream, and milk together, the add a little seasoning to taste. I have to admit I tend to taste the mixture to check the seasoning but I know this won't be everybody's cup of tea.

4) Place the tarts onto a baking tray, then pour in the custard mixture until they are very full, then carefully place in the oven and bake for 15-20 minutes at gas 5, until the centre is just set but still has a tiny bit of wobble. Allow to cool a little but eat warm, with some summery salad on the side.

Monday, 14 May 2012

The original Bakewell pudding


And...relax. I've only just recovered from an intense week which involved driving 300 miles across the country to interview a rather lovely lady for work. Despite being no specialist in oral history, I was somehow nominated to lead on interviews for my project (how?), and spent last week in the Peak District. Though beautiful, that part of the country has more green space than London, so was a lot grassier, muddier, and general squelchier underfoot than I am used to in my urban cocoon.

A small ray of sunshine in the trip (apart from my interviewee, who was charm itself) came in the shape of the original Bakewell pudding shop, just a stone's throw from our hotel.

As a girl who was happily raised on the Mr. Kipling monstrosities - and still retains a soft spot for them - I was more than a little intrigued by this wholesome original. What makes it a pudding and not a tart? And why does it look so, er, rustic (or splat on a plate, as my colleague so kindly put it).

Well the pastry is puff and not shortcrust, lined with jam, and has a crunchy base from the caramelised sugars that have seeped through. Lovely. And instead of a thick layer of child-friendly icing, it's topped with an almondy custard, giving it an unfamiliar wobble. My verdict: tasty, but tooth achingly sweet. One to be enjoyed in thin slivers with a pot of tea perhaps, and not bolted down instead of breakfast in an otherwise bare kitchen, the morning after returning from a trip away. My mistake.

Sunday, 29 April 2012

Brunch bunch: parmesan French toast


Breakfast is often just that - a break to the fast of the night, squeezed into the gap between bathroom and hair drier before work. It's usually a monastic bowl of hearty muesli for me, or maybe some heartwarming porridge if it's chilly outside. Not something to linger over.

Brunch, however, is something else entirely. I was blown away by the droolworthy selection on offer at John Torrode's Luxe restaurant yesterday. My eggs Benedict was a plateful of brunchy joy, perfectly poached eggs under a decent blanket of smooth hollandaise. Not the indecent drenching that I would usually give myself at home, but then I didn't have to waddle out of the restaurant either, so all the better for it.

In the spirit of Luxe, I giving my brunches the attention they deserve, starting with some tweaks to an old favourite.


PARMESAN AND CHEDDAR FRENCH TOAST WITH GREEN CHILLI SALSA
Serves 2 greedy brunchers

~for the French toast
5 eggs
100ml whole milk
40g Parmesan, finely grated
30g mature cheddar, finely grated
a pinch of cayenne
a small pinch of salt
30g butter
5 slices of day-old white bread

~for the tomato salsa
4 ripe tomatoes, chopped into 5mm dice
3 spring onions, finely chopped
2 mild green chillies, finely chopped
salt and pepper
1 tbsp extra virgin olive oil
½ tsp cider vinegar

1) Whisk together the eggs, milk, cheeses, cayenne and salt, then dip each slice of bread into the mixture, giving each one a good soaking.

2) Stir together all the salsa ingredients, adding salt and pepper to taste, then warm through in a small pan.

3) To cook the French toast, melt a knob of the butter in a non-stick frying pan, then fry each slice over a medium heat until golden brown, flip and cook the other side. Serve with a dollop of the salsa.

Monday, 16 April 2012

New ingredients: Sweet tamarind


This little fruit caused quite a stir in my office when I took some in last week, so I thought I should introduce it here too: sweet tamarind.

When I grabbed a handful of these to nibble at my desk for breakfast, I had no idea that they would become the centre of attention. Cue curious looks and manhandling. Although lots of my colleagues were familiar with the type of tamarind that is used in curries as a sharpening agent, no-one had come across the sweet version before. There was lots of interest, and plenty of inuendo. Yes, they look suspect, but they taste delicious.

In the immortal words of my boss, "this is going to sound stupid, but it tastes like...tamarind". Yes, it does taste like tamarind, only far less sharp, almost jammy in fact. The texture is something like a date, slightly fibrous but also squidgy. There is a mellowness to it that is absent in the cooking type.

Getting into them can be tricky - the bark is hard and brittle, almost like a shell, and needs to be cracked open. The fruit inside is covered with a thin, spidery branch-like structure, which should also be removed before eating. Watch out for the shiny brown pips inside! To be honest, if I'd had a banana in the house, I would have taken that for breakfast instead, but I was having a disorganised start to the day.

If you fancy trying them in the convenience and privacy of own home, boxes are widely available in Asian stores in London, or here online. Just don't show them to the people you work with.

Saturday, 14 April 2012

Warm butter bean and spinach salad with crispy garlic


Oh dear, apologies for being such a slack blogger recently - I blame a combination of a demanding work schedule and my recent discovery of a rather excellent new spirits shop on Wardour Street (Amathus in case you're interested). They have an incredible selection of world rums that I've been exploring with more vigour than is probably wise, leaving me happy and very relaxed, but with no time for cooking. Oops.

Much of my recent meal prep has been quick, where dishes like this come into their own. I love tinned beans and pulses - they're super healthy and don't require days of planning and advance soaking like dried pulses. This recipe is uber easy and makes a nice quick lunch or light supper. It also hovers in the non-committal world of warm salads which have been so loving during these strange sunny/thundery days of April. I have to admit, I can't wait for summer to start.


WARM BUTTER BEAN AND SPINACH SALAD WITH CRISPY GARLIC


about 200ml vegetable oil
a whole bulb of garlic
4 tbsp extra virgin olive
½ onion, finely diced
1 stick of celery, finely diced (if there are any celery leaves, chop and add them to the mix with the parsley)
450g fresh spinach
400g can of butter beans
½ lemon
3 tbsp fresh parsley, chopped
salt and pepper

Greek yoghurt and crusty bread, to serve

1) Separate and peel all the cloves of garlic, keeping 2 cloves aside. Finely slice the rest into even 1mm thicknesses. Pour enough vegetable oil into a small saucepan to come 1cm up the side, and fry the garlic over a low/medium heat until golden. Be careful not to let it brown as this will make the garlic bitter. Sprinkle with a little salt and leave to drain on kitchen towel.

2) Heat the olive oil in a large saucepan and gently fry the onion for a few minutes, until soft and translucent, then add the garlic. Fry for a minute more, then add the celery. Cook until soft, then add the butter beans to the pan and allow them to warm in the juices before adding the spinach. Pop a lid on the pan and allow to cook until the spinach has wilted.

3) Sprinkle over the parsley (and celery leaves, if using) and squeeze over the juice of the lemon, then season with a little salt and some freshly ground black pepper. Sprinkle over the crisp garlic and serve immediately.

Thursday, 5 April 2012

Sweet potato cakes in a crispy sesame coat


I love it when friends go on their travels. There's something so wonderfully evocative about hearing their tales of food markets and dishes from across the seas. And perhaps, if I'm lucky, I might receive a small parcel of some strange and exciting food stuff, like the kodampuli last month.

Hearing the stories of a friend just back from Tokyo reminded me of my own memories of Japan. I loved their appreciation of fresh, seasonal ingredients, prolific use of umami flavours, and ability to bring out the inherent beauty of food itself.

We had to stick to a serious budget on our trip, so we often avoided restaurants and instead picked up a few delicious and mysterious nibbles from a food shop, to picnic with in one of the parks, or by the river in Kyoto.

Sweet potato cakes were a common sweet that I ate a lot of, a type of wagashi (traditional sweet) I think. If you live in London do try one of the jewel-like sweets in wagashi shop Minamoto Kitchoan on Piccadilly, they are so very pretty and tasty to boot. This recipe is a play on the wagashi I remember, a little less sugary perhaps but full of the natural sweetness of the potatoes, and coated with crispy toasted sesame seeds.

SWEET POTATO CAKES IN A CRISPY SESAME COAT

Makes 20

600g sweet potatoes
40g softened butter
30g sugar
2 egg yolks
tsp ground cinnamon
3 tbsp plain flour
½ tsp vanilla extract
pinch of salt
about 1½ cups sesame seeds (about 200g)

2 x silicon baking trays, or 2 x oiled and floured baking trays

1) Bake the sweet potatoes for 35-50 minutes (depending on size) at gas mark 6, until soft all the way through. Scoop out the soft flesh and beat in the butter, sugar, egg yolks, cinnamon, flour, vanilla and salt. Chill the mixture for an hour.

2) Pour the sesame seeds into a bowl. Use a teaspoon to scoop out rounded teaspoons of mixture, and drop each one in the seeds, giving each a generous sprinkling all over with seeds until they are completely covered, then very gently use your hands to pat them into 6cm rounds. You will need to be very careful as you do this, or they will smoosh. Place each cake on the baking tray, leaving a centimeter space between each.

3) Bake for 15 minutes at 400f/200c/gas mark 6, or until the sesame seeds are golden but not turning brown at the edges. Leave to cool on the trays for 5 minutes before transferring toa wire rack to cool.

These are best eaten fresh, as the seeds will soften on storage, but they can be recrisped by heating briefly in the oven again.

Thursday, 22 March 2012

New ingredients: Kodampuli


What strange, wrinkly creature is this? May I introduce kodampuli, an extra special gift brought back from Kerala by a very sweet, thoughtful friend. She knows I love a mystery ingredient!

I have been reliably informed that these smoked, sun-dried fruits are quite specific to south Indian cuisine, and used only in fish curries. They don't have much aisle appeal - slightly mummified in appearance, and almost black. I can imagine the smell would put many people off too - heavily smoked, with an intense sour, almost meaty fragrance.

I'm not so savvy about Indian cooking, probably because I've mostly lived in areas of London which have large African-Caribbean communities, so the cuisine is off my daily radar. But I do love a well spiced dish, so these will be tested this weekend in an Anglicised version of the pomfret coconut curry recipe which also came back with my friend. If the results are good, the recipe will follow...

Tuesday, 20 March 2012

Sour cherry and hazelnut florentines


These are based on an old recipe my mum used to make many, many years ago. I love florentines so it was rather frustrating when the recipe disappeared for a decade, during which time I tried other variations. But none of them had the same buttery crunchiness, not even saint Delia's.

If you'd rather return to the old standard, replace the sour cherries with a 50/50 combination of finely chopped glacé cherries and apricots. I find the sharpness of the sour cherries works to balance out the rich nuts and chocolate, but there's a guilty pleasure to be had in those sticky glacé cherries too.

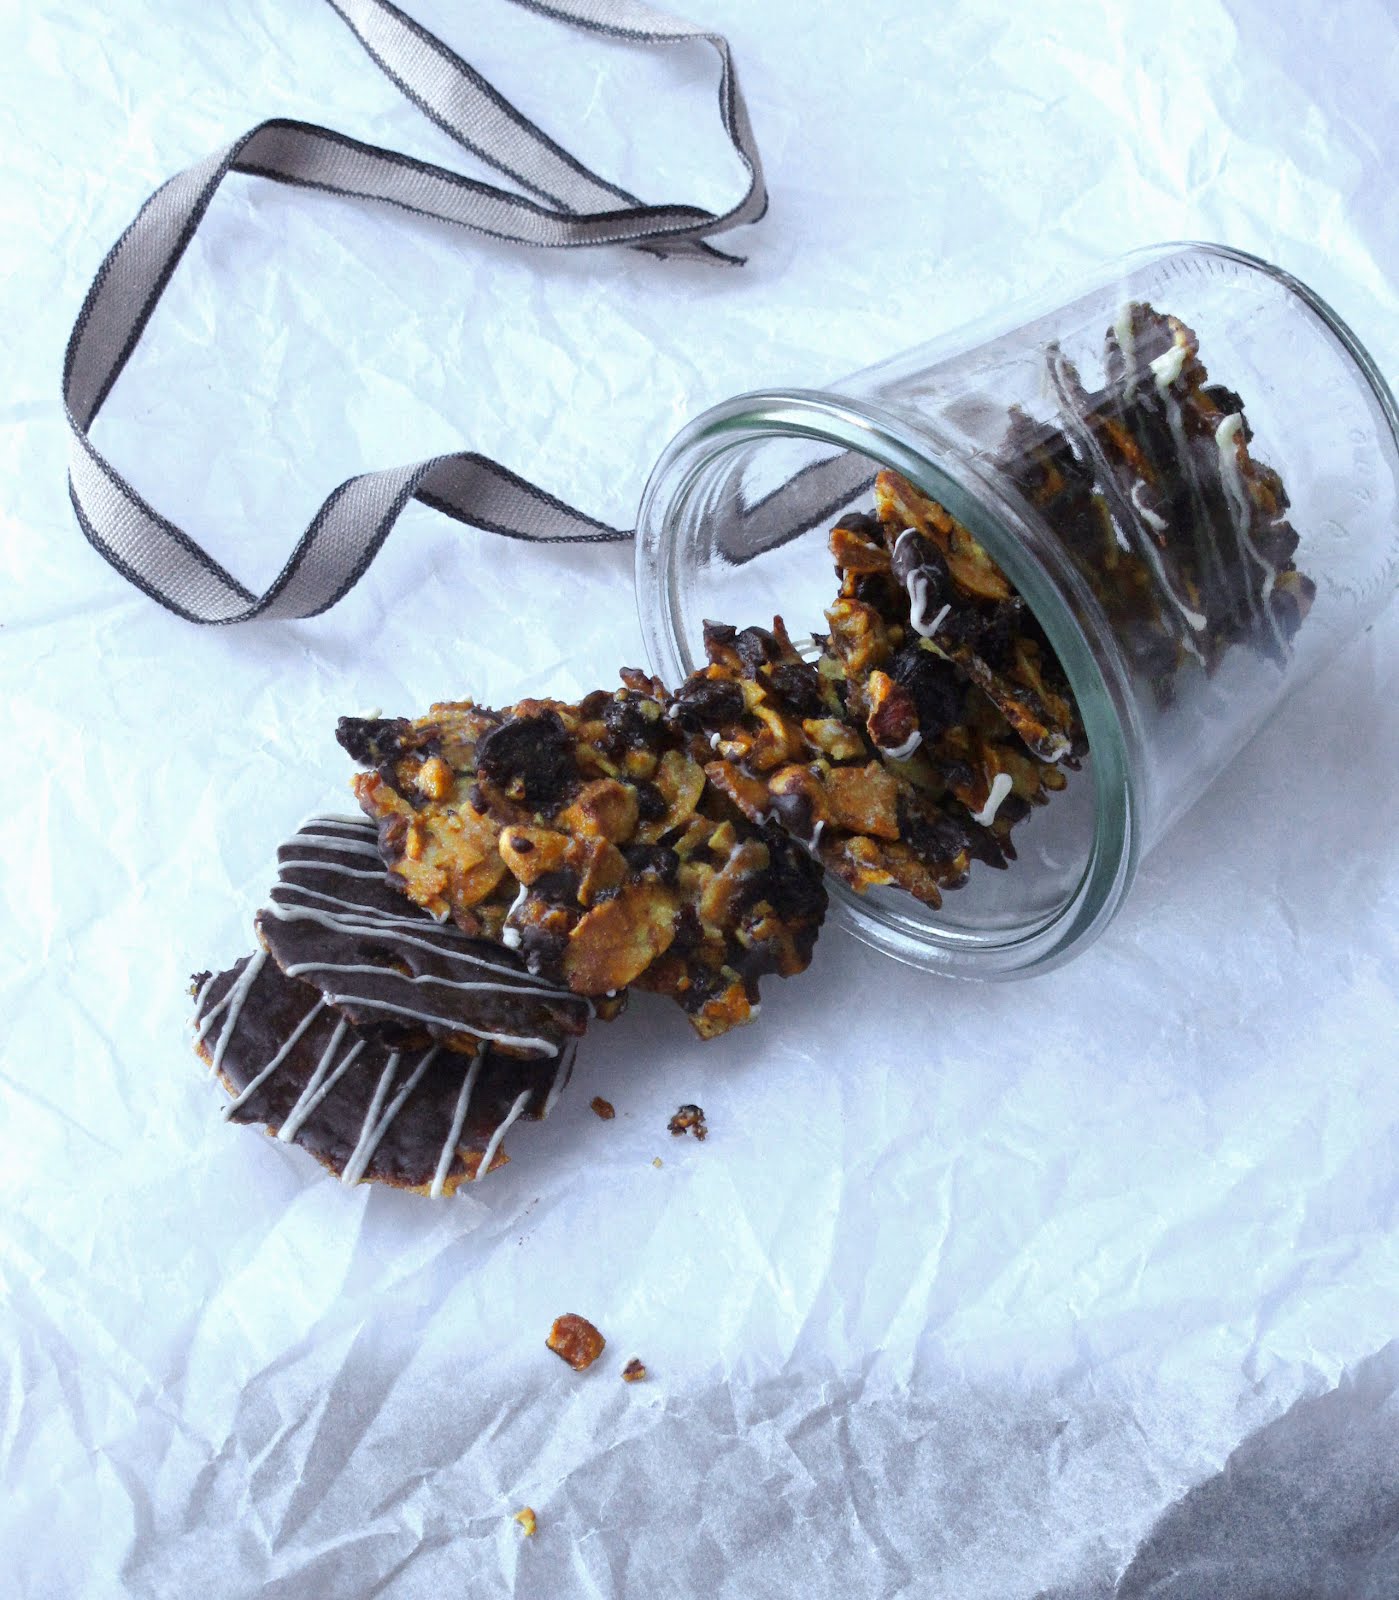
A dozen of these delicate thins piled up in a ribboned Weck jar made a handsome birthday gift for a friend this weekend, which made me think... I know that Christmas is another nine months away, but I'm adding these to my edible giftlist for 2012.

SOUR CHERRY AND HAZELNUT FLORENTINES
Makes 35 small biscuits

75g flaked almonds, crushed
25g finely chopped, blanched hazelnuts
75g finely chopped sour cherries
85g butter
100g caster sugar
a pinch of salt
100g dark chocolate
25g white chocolate

1) Place the almonds, hazelnuts and cherries into a large bowl and toss together to combine.

2) Melt the butter in a small pan then add the sugar and salt, and stir until it comes to the boil. Allow to bubble for one minute whilst stirring vigorously. Take care with the mixture - remember it contains extremely hot sugar! Pour over the fruit and nuts and stir in well.

3) Spoon slightly heaped teaspoons (the measuring kind, not the kind you use to stir your tea with) of the mixture onto two silicone baking sheets, leaving 5cm around each to allow for the biscuits to spread as they cook. Bake at 350f/180c/gas mark 4 for 10 minutes, or until golden brown.

4) As soon as you remove them from the oven, use a knife to shape each biscuit into a neat round, about 6cm in diameter, then allow to cool until firm enough to lift onto a wire cooling rack.

5) Melt the two chocolates in separate bowls over bains marie. Use the back of a spoon to use the dark chocolate to 'paint' the flat side of each biscuit, and allow to cool. Once firm, use a piping bag with a 1mm hole cut at the end to drizzle the white chocolate in lines over the biscuits. Leave to cool again before storing.

Wednesday, 7 March 2012

A sucker for a good thing


Until recently I was an octopus novice. Eaten once or twice yes, but never attempted at home. But in Portugal they are quite obsessed with it, and rightly so. I was converted.

Octopus has a reputation for being a difficult beast - hellishly tough if overcooked - and huge. Not something to cook on a whim. Poor things. Now I feel bad for presuming, having discovered how ridiculously easy they are to cook. They'll never have the yielding tenderness of a young squid - too large and muscled for that - but long, slow cooking reduces the flesh to a gelatinous softness that is very pleasing.

The magic trick: it goes against every instinct in me to prefer frozen to fresh, but my Portuguese cook/mentor swears that previously frozen octopuses are more tender, and after some testing I must agree. Most octopus in the UK will be frozen anyway, but if you happen upon a fresh one, freeze it overnight before defrosting thoroughly the next day for cooking. Then simply allow the octopus to very, very gently stew in it's own juices, add oil, vinegar and salt, and enjoy those pretty pink tentacles.

PORTUGUESE OCTOPUS SALAD
Serves 4

2 small octopuses (about 1200g combined weight) which have been frozen then defrosted
500g baby new potatoes
4 eggs
large bunch of fresh coriander (50g)
1 onion
1/2 cup (100ml) of extra virgin olive oil
4 tbsp cider vinegar
salt and pepper

1) If the octopus hasn't already been cleaned: remove the internal organs from the body including the quill bones, then press the beak and the soft fleshy part around it out from the centre of the tentacles, cut out and discard. Wash and dry.

2) To cook, place the octopuses in a large pot and turn on the heat to the lowest setting. Allow to slowly cook in their own juices for about 40 minutes to an hour. When the flesh can be pierced easily at the thickest point (where the legs meet the body), then they are done. Once cooked, allow to cool before cutting into small chunks.

3) While the octopuses are cooking, boil the potatoes till cooked through with a large pinch of salt. Place the eggs in cold water, bring to the boil, and simmer for 5 minutes. This should give an egg that is hard boiled but not dry. Cut both into bit sized pieces, and place in a bowl with the octopus.

4) Chop the onion into thin slices, add to the mixture, then chop the coriander and add that too. Whisk the oil and vinegar together in a bowl, add a large pinch of salt and pepper, and use to dress the salad. Check for seasoning (you may need more vinegar depending on how sharp it is), and serve warm with a hunk of crusty bread to mop up the juices.

Sunday, 4 March 2012

Fernandez & Wells


I'm on a mission to sell London. A good friend recently moved back to the UK from Melbourne and is probably (hopefully!) going to move to London once she's settled. In the meantime I am, totally selflessly, running a campaign to show her the very best of London, starting yesterday with a sunny day of contemporary art galleries and damn good coffee in Soho.

The Beak Street Fernandez & Wells has been one of my firm favourites since it opened, and now has the Suzy stamp of approval too. We arrived with serendipitous timing, just as two seats opened by the window, great for people watching. Note: must try harder not to giggle when people fall off the pavement, windows are two-way after all.

We both loved their beautifully poured stumpies (their version of a flat white), and my friend even picked up shades of the famous Aussie cafe relaxed atmosphere. Praise indeed. I'm hoping that will work as an extra convincer.

My cheese toastie was totally delicious and deserves a special mention - I wouldn't normally rave about a sandwich but the cheese and sourdough bread were both great quality and the addition of finely chopped leek and red onion cut through the richness brilliantly.

Another selling point for F&W - a new branch of Aesop, the cult Australian skincare brand, has just opened around the corner. My friend is now totally sold on their high quality botanical products, and the shop almost persuaded me to part with my Oil of Olay. Almost but not quite - my mother has used it for 40 years, and still looks ten years younger than she really is. That's good enough for me!

Next stop on the Sell London mission: a visit to the carefully selected coffees at St. ALi in Clerkenwell, a Melbourne import which should close the deal. Wish me luck!

Friday, 24 February 2012

Cubeb pepper & orange shortbread


A new ingredient to play with! Cubeb peppercorns. I discovered them at the ever tempting Spice Mountain stall at Borough Market. They have every spice you could ever dream of, including a dozen peppers, all calling out to be tested.

This one proved irresistable. It's a rare Indonesian spice which has a warming, allspice-y flavour, with the mouthwatering quality of szechuan pepper. There's a touch of something medicinal in there too, but not unpleasantly so.

I thought the spicy bitterness would be tasty if paired up with some sugar to mellow the pungency, and so these cookies were born. Blended with the zest of an orange and some plain old black pepper, these were a deliciously crumbly biscuit, dense with butter but melt in the mouth.

They were also suprisingly sturdy - a batch came with me on a research trip for work - well wrapped, they survived all the way to Warwick, before being demolished for elevenses.

CUBEB PEPPER & ORANGE SHORTBREAD COOKIES
Makes 9

130g room temperature butter
55g caster sugar
a large pinch of salt
125g plain flour
50g fine semolina
¼ tsp ground black pepper
¼ tsp ground cubeb pepper (or ground allspice)
the grated rind of an orange

plus, two more tablespoons of caster sugar to top the biscuits before baking

1) Put the butter in a large bowl with the caster sugar and orange rind, and cream until blended with a wooden spoon. Sift together the flour, semolina, salt, peppers and mix into a consistent dough. Try not to work it too much or the mixture will become toughened.

2) Make into a rough log shape about 7cm in diameter, wrap in clingfilm, and chill for an hour before slicing into nine equal slices.

3) Lay out the dough on a greaseproof paper covered baking tray, with enough room between each slice for the dough to spread a little while it cooks. Use the last 2 tablespoons of sugar to thickly coat the top of each biscuit, and bake at 325f/170c/gas mark 3 for 30 minutes. Leave to cool on the tray for 10 minutes before transferring to a cooling rack.

Tuesday, 21 February 2012

Raspberry & ricotta pancakes with honeycomb syrup


Happy Shrove Tuesday! I love any holiday that centres around food, but pancake day is a particular favourite. Sweet cakes-in-disguise with syrup for breakfast? Yes please. I'm afraid this version doesn't strictly adhere to the tradition of using up what's left over in the cupboards, but they are heavenly.

I based these on a fail safe recipe by Jamie Oliver for thick fluffy American style pancakes, then upped the fluffy-factor by adding ricotta and reducing the flour, to create an almost souffléd mouthful. The raspberries are essential for giving the impression of healthiness. Just close your eyes and don't think about the syrup...

RASPBERRY & RICOTTA PANCAKES WITH HONEYCOMB SYRUP


Makes 10

~for the pancakes
250g ricotta
the zest of a clementine
a pinch of salt
3 tbsp milk
80g (1 tightly packed cup) plain flour
3 large eggs
100g raspberries

~for the syrup
6 tbsp caster sugar
50ml water

1) First make the syrup by allowing the sugar to melt over a low heat. Don't stir the sugar, but you can swirl the pan gently to bring in any bits left at the edges. Continue to heat until the sugar has turned a rich brown colour, then turn off the heat and stand well back before adding the water to the pan. It will spit and bubble for 30 seconds. When the bubbling has died down, bring the heat back up and let the syrup warm through whilst stirring, until it is smooth.

2) Separate the eggs into two bowls, then add the clementine zest, salt, milk, and flour to the egg yolks and blend until smooth with a whisk. Whisk the eggs whites with a clean whisk, then fold gently into the flour mixture.

3) Heat a large heavy bottomed frying pan over a low heat, then spoon the mixture into thick, 10cm blobs. Press a few raspberries into the top of pancake, then leave for about 3 minutes, until small bubbles have started to appear around the edges. Use a palette knife or spatula to carefully turn each pancake - the bottom of each should be golden at this point. Allow to cook for another 2 minutes then set aside while you continue to cook the rest of the batter in batches. You may need to wipe any raspberry juice that has leaked from the fruit off the bottom of the pan occasionally, or it will catch on the bottom of the pan and spoil the other pancakes. Serve with the warm honeycomb syrup.

Wednesday, 15 February 2012

More tales from Portugal: Peniche


A small window into another time...

We saw these fish drying in the sun next to the usual washing line of clothes down a quiet street in Peniche.  The town's traditional fishing industry is still running - some parts of town hum with the smell of sardine canneries - but is now supplemented by tourism, and surfers hoping to catch one of the energetic waves that thrash the sandy beaches.

These look like some sort of rays to me but we didn't spot them in any restaurant windows.  I like that Peniche is still the sort of town where people are trusted not to take what they find - a philosophy which extends to their churches, where valuable icons are sometimes left unattended.  I am sad to say it would never happen in London, but it was nice to know that way of life still exists, somewhere.

Monday, 13 February 2012

Fairy tales and fairy cakes

Who ate all of granny's cakes?

Are you a fan of fairy tales?  Enjoy circus skills?  Love spending your Saturday night in a dank tunnel?  Then you would have enjoyed Don't Stray From the Path, an interactive theatre piece which took place last week in the tunnels underneath Waterloo station, courtesy of the Old Vic theatre.

It's a truly atmospheric venue, authentic with London grime and smothered with decades of graffiti as you near the entrance.  It was owned by British Rail until very recently, and it shows: the dimly lit corridors are still occupied with cogs and things that go whirr, the rumbling echo of a train occasionally passing overhead.  There's an unexpectedly cosy industrial-style bar space, but their limited bar didn't run to my favourite rum so we didn't stop for a drink.

Although this performance was for a few nights only the venue is open for other events until September so there's plenty of time to have a look.  I felt a bit mixed about this piece.  There were some original bits of set dressing that suited the rough-and-ready style, and the psychosexual edge to the narrative stopped the fairytale elements from drifting into chintziness.  However, there were also some staging issues with moving the audience around the space and some parts of the production felt disjointed to me, as if they were from entirely different pieces.  Still, it's amazing what they achieved in just 4 weeks prep time, so well done to them.

Oh, the wide eyed girl above was collecting cakes for granny from the audience - but gobbled them all up!  Greedy guts.

Thursday, 9 February 2012

Staying put and keeping cosy


It's -3 outside and snow is slowly covering the ground in a picturesque veil of white. It's double glove weather, time to bunker down and avoid going out (except for those completely legitimate snowball fights, which must always be followed by a strong, reviving cuppa).

My solution to the cold is soup, and lots of it. I spent yesterday happily making this hearty soup, packed full of mediterranean veggies and beans, and with a few orzo (rice-shaped pasta) thrown in to make it a meal.

A tip: if you have the hard end of a piece of parmesan left over in the fridge, use that instead - or as well - as the grated cheese in this soup. Toss it in whole and it will give its cockle-warming umami tones to the dish. Delicious and thrifty.

TUSCAN BEAN SOUP WITH PESTO
Serves 6

1 onion, finely chopped
4 cloves of garlic, finely chopped
2 small carrots
1 aubergine
1 large courgette
1 stick celery
1 red pepper
400g cooked borlotti beans
5 plum tomatoes
1/4 cup (30g) orzo, or other small pasta
3 tbsp olive oil
2 bay leaves
a pinch of dried rosemary
a sprig of fresh thyme
1 1/2 litres water
5 tbsp grated parmesan

~for the pesto
40g basil leaves
8 tbsp extra virgin olive oil
1 tbsp pine nuts

1) To make the soup, first cut the carrots, aubergine, courgette, celery and red pepper into 1cm dice. Heat the 3 tablespoons of oil in a large pan.

2) Gently fry the onion over a low heat for five minutes, then add the garlic and fry for a further minute. Add the carrots and aubergine and fry for another few minutes before adding the red pepper, courgette and celery. Break up the tomatoes with your fingers into rough pieces, and add them to the pot with the orzo pasta, herbs, borlotti beans and water. Simmer for 30 minutes, then add the parmesan and season with salt and pepper.

3) While the soup is cooking, make the pesto by blending together the basil, pine nuts and olive oil until you have a rough emulsion, then add salt to taste. Serve the soup with a spoon of pesto to stir through.

Sunday, 5 February 2012

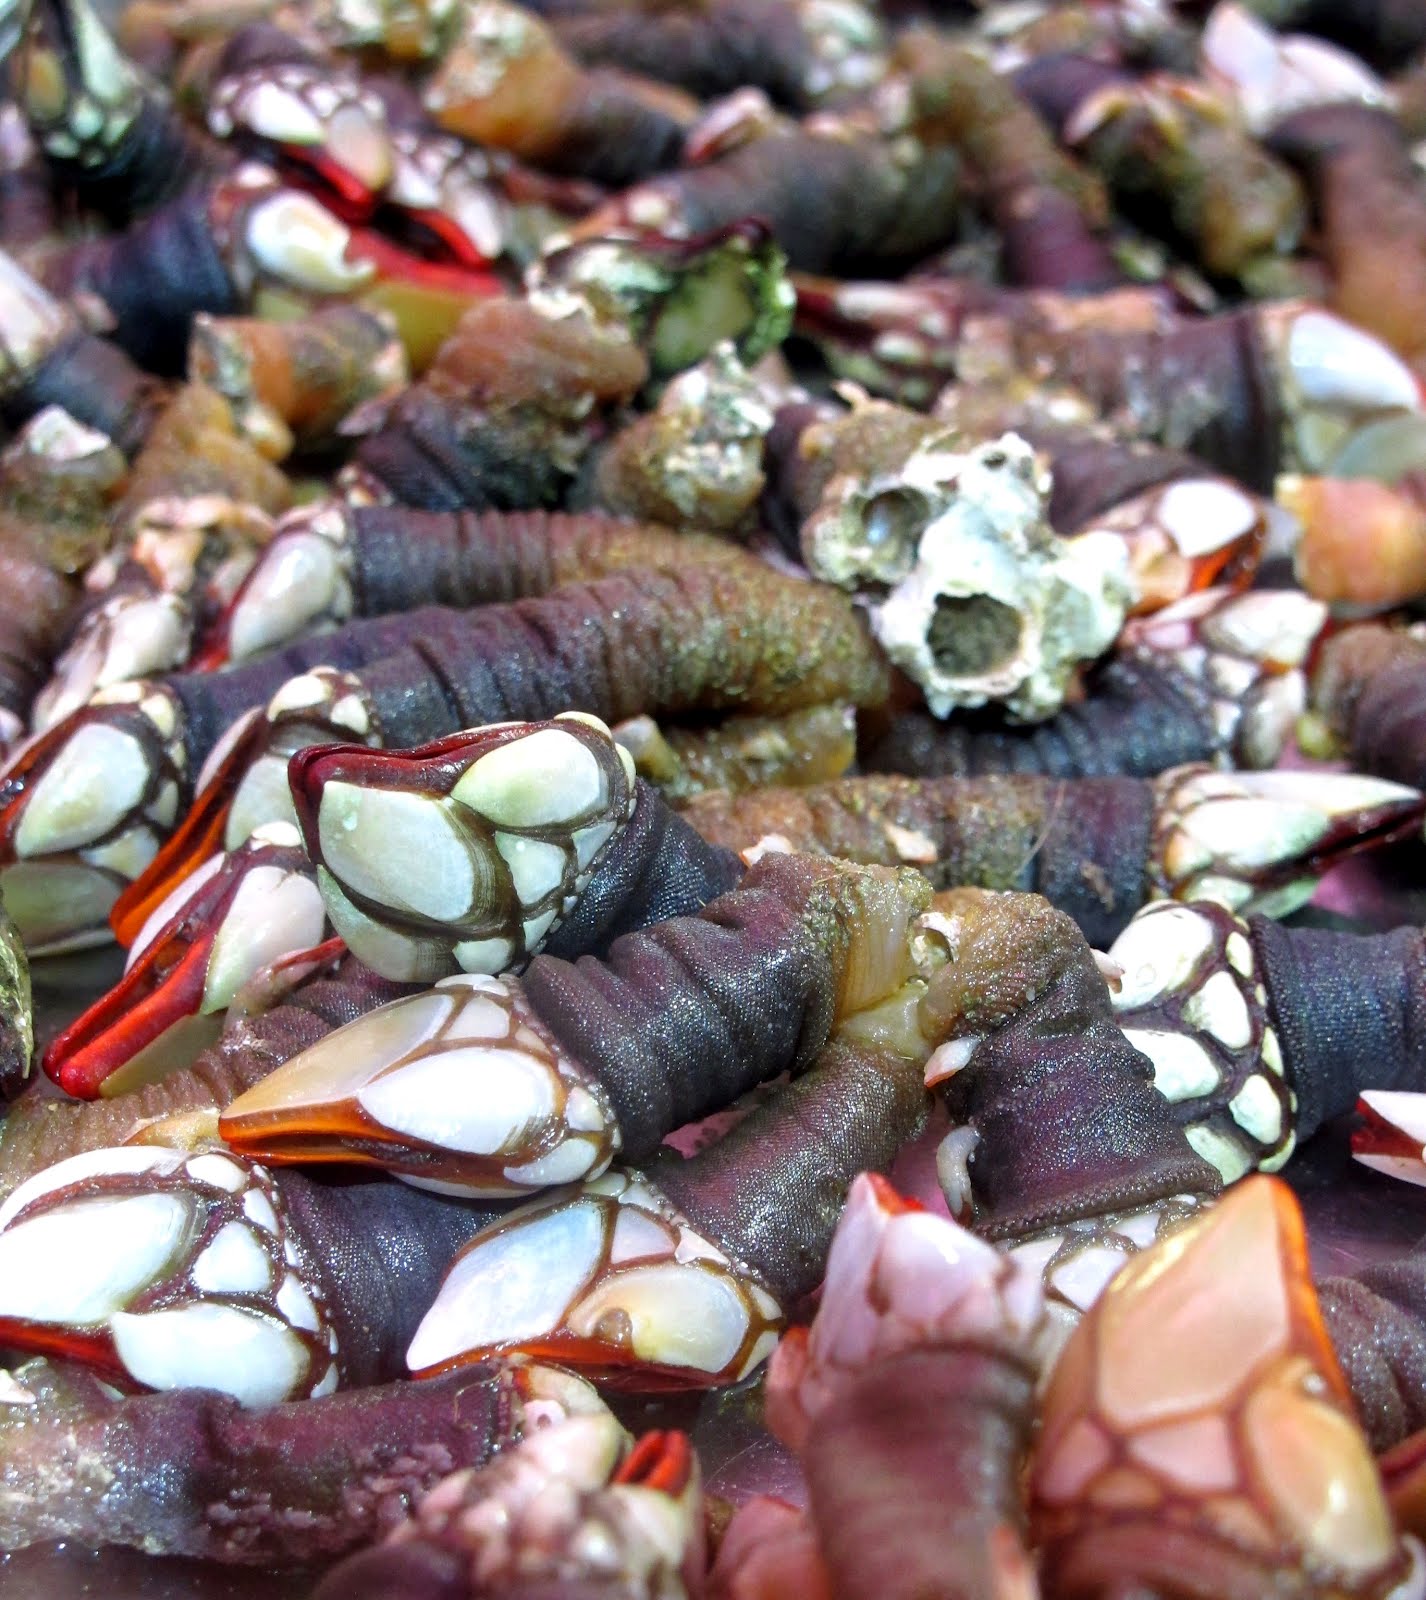
Animal, vegetable or mineral?


I'm still puzzling about what this mysterious creature could be, spotted in a restaurant window on Rua Augusta in Lisbon.

Any ideas?

I've never seen anything like it!

Sweet dreams are made of this


Bom dia! I returned from Lisbon this week, fat but happy. As I'm snowed in this morning along with the rest of London, I thought I'd share one of my highlights from the trip with you.

I have to admit that I was attracted to Portugal in order to try those delicate little custard tarts called pastéis de nata, a speciality in Lisbon. I've had some before which were very tasty, but surely they'd be even better in their spiritual home?

The pastéis are said to have originated from the Hieronymite monastery in Belém in the 1830s, when the monks fell on hard hard times after being expelled. The tarts soon began to be made to the same recipe in an adjoining building, which continues today as the Pastéis de Belém cafe on the Rua de Belém, using the same recipe from 1837. I was told that today only two people know the closely guarded recipe. All of which means that eating there counts as culture and not gluttony, which means it's a guilt-free trip. Happy days.

The cafe itself is quite beautiful, tiled in the traditional blue and white azulejo style. It's a popular spot with visitors and locals alike - even in January there was a decent queue waiting for a batch to appear.

The pastéis are served warm from the oven so the flaky pastry is crisp and the custard is only gently set and seductively creamy. Each tart has a dash of heady vanilla, which can either be complemented with a dash of powdered sugar or cinnamon from the shakers provided, or enjoyed alone. There is an art to achieving the right amount of caramelisation both on the top and underneath which they are very aware of - I took a walk past the open kitchen and saw a woman carefully inspecting the bottom of each pastéis. Those that did not please her discerning eye were tossed aside. They still looked delicious to me...

Thursday, 26 January 2012

Polenta, roasted vegetables and peppered parmesan crisps


Ahh, pretty no? I had to stop and take a moment while I was prepping the veg for this dish. The leftovers caught my eye. Those autumnal colours do brighten up a chilly January kitchen.

Anyway, supper:


One last blog before I skip off to Portugal tomorrow for sun, sea and as many of those delicious little custard tarts as I can cram into my greedy little suitcase. Delish!

I've been experimenting with vegetarian dishes recently, partly to take advantage of all the lovely winter vegetables around, and partly because I seem to be having rather a lot of vegetarians over for dinner. I hadn't realised quite how much I rely on fish to be the centrepiece of a meal until I was tasked with avoiding it. I like that this polenta has drama in the vivid colours of the squash, rocket and beetroot. And having the lot laid out on a board makes it feel more casual, which is right for the kind of meal that I have with close friends.

I used the Crown Prince variety of squash for this, which hides a wonderful surprise. Below the misleadingly drab blue-grey skin it has vibrant orange flesh, really beautiful. The black pepper and parmesan crisps scattered on top aren't strictly necessary but they add crunch and intense little bursts of flavour.

POLENTA, ROASTED VEGETABLES AND PEPPERED PARMESAN CRISPS
Feeds 4
~ for the roasted vegetables
1 small Crown Prince squash (about 450g)
3 raw beetroot (about 200g)
2 small red onions
3 tbsp olive oil
juice of 1/2 lemon
salt and pepper

~ for the polenta
200g fine polenta
1 litre water
1/2 tsp salt
50g butter
65g grated cheese (I used a 50/50 mix of parmesan and taleggio)
a pinch of ground white pepper

~ for the parmesan crisps
50g grated parmesan
a very large pinch of black pepper

a big handful of rocket (arugula)
2 tsp of fresh picked thyme leaves

1) Start with the roasted vegetables: Peel the squash and chop into cubes roughly 2x2cm, then wash the beetroot and chop into similarly sized chunks. Toss in the lemon juice and oil, season lightly with salt and pepper, and bake in a roasting tin for 20 minutes at 425f/220c/gas mark 7, then chop the onions into slim wedges and continue to bake for a further 25 minutes.

2) While the vegetables are cooking get on with the polenta by bringing the water, salt and half the butter to a simmer in a large pot, then slowly adding the polenta in a fine stream, stirring all the time. Continue to simmer over a low heat for 35 minutes, stirring often to prevent it sticking to the bottom. The polenta should be thickened but still soft at this point. If it starts to dry out too much, add a cup of water. When cooked, stir through the rest of the butter, the cheese and the white pepper.

3) To make the crisps, scatter the grated parmesan evenly over a silicone sheet, or lightly oiled greaseproof paper, and bake at 400f/200c/gas mark 6 for 5 minutes, until golden but not browned. After cooling for five minutes, crumble into crisp pieces with your fingers.

4) To serve, spoon the polenta over a board (or onto plates), scatter over the vegetables and any roasting juices, then the rocket and thyme. Tuck the parmesan crisps in between the veg, and eat while hot or warm.

Soggy biscuits


For the biscuit-a-holic in your life.

I wish I'd found these brilliant cushions before Christmas, they would make excellent gifts for people with children. Designer Nikki McWilliams showcased these little beauties off at the Top Drawer trade show here in London a couple of weeks ago.  I think they hit just the right nostalgic note, riding the same wave of golden childhood memories that have made retro sweeties so popular for the past few years.  Best accessorised with a tea stained sofa...

Monday, 23 January 2012

An ultra rich chocolate & orange fudge cake


A dense, super-chocolately fudge cake for those occasions when only something completely indulgent will do.

It was the birthday of a good friend last weekend, her 33rd. She has a one year old and hasn't been out of the house alone with her partner since November. I offered my (inept) babysitting skills to let them out for the night, and took this chocolate cake to make up for the poor quality childcare.

My child care experience amounts to one instance when I was fifteen - the boy was six. He took one look at me and knew he had the upper hand. We were up till 11pm as he laid waste to the house while I trailed behind him with a dustpan and brush. Thankfully little Elliot was an angel, and even when he was up, was still a total pleasure to be with. Except when he chewed my ear. I could have done without that.

Be warned: this cake smells amazing in the kitchen - the scent of chocolate and orange zest was so intoxicating that I almost cracked and ate a piece before taking it to my friend's. Tut tut.

CHOCOLATE & ORANGE FUDGE CAKE
Feeds 12

~for the cake
100g soft butter
220g caster sugar
2 large eggs
the juice of an orange, made up to 250ml with whole milk
1 tbsp cider vinegar
the grated rind of an orange
100g melted dark chocolate
15g cocoa powder
300g self-raising flour
½ tsp bicarbonate of soda

~for the chocolate ganache frosting
350g dark chocolate
100g butter
200ml sour cream
2 tbsp Grand Marnier or other orange liqueur
the rind of an orange

1) Preheat the oven to 350f/180c/gas mark 4. Now to make the cake: whisk together the butter and sugar for one minute, then add the rest of the cake ingredients in the following order, whisking for a minute between each addition: eggs, orange juice and eggs, vinegar, orange rind. Finally stir in the melted chocolate, then sift over the flour, bicarb and cocoa and fold in.

2) Lightly oil two 20cm round silicone cake tins, and divide the mixture equally between them. Bake in the centre of the oven for 30-35 minutes, checking after 30 minutes with a toothpick to see if they are still wet in the centre. If they are, give them the remainder of the cooking time. Leave to cool while you make the frosting.

3) Allow the chocolate and butter to melt together in a bain marie, then remove from the heat and briefly stir in the sour cream and orange liqueur, trying not to overwork the mixture. Now take one of the cakes and place on a dish or cake stand, and spread a third of the chocolate ganache over the cake. The ganache should come right up to the edges of the cake. Then pop the other cake on top, flat side up (it makes the cake neater), and dollop the rest of the ganache on top. I find it easiest to use a round ended knife, like a butter knife, to smooth the topping over the top and sides. Try to work fairly quickly, as the chocolate will start to set if you're working in a cold kitchen.

4) Grate the orange zest over the top of the cake while it's still warm, and wait until completely set before slicing.

Thursday, 19 January 2012

Diamonds are a girl's best friend


It's hard not to be excited about the Diamond Jubilee in June -not only do we get an extra day off work (hooray!) but there are all sorts of Queeny bits and bobs gracing our shelves in the lead up.

I love this wind-up musical Jubilee biscuit tin from Fortnum and Mason which plays a twinkly nursery version of God Save the Queen. Marvellous stuff. I discovered it whilst hunting for a classy biscuit gift for my partners' aunt, who is kindly lending us her apartment in Portugal next weekend (and requested a delivery of PG Tips). You can take the girl out of Britain, but...

It has a proper old world feel to the metal tin - like a toy from childhood - and the biscuits are a suitably trad Cornish clotted cream digestive. Plus you've gotta love a dancing lion/unicorn combo haven't you?

Makes me come over all teary eyed for her Maj it does. Sniff sniff. Gawd bless her!

Sunday, 8 January 2012

B-logging into the new year

Happy new year! Apologies for the lengthy silence, I was struck down with an unwelcome bout of festive flu and have since been luxuriating in the wonderousness of my own full health. Sometimes it's enough just to feel normal again...

People keep asking what my favourite Christmas present was this year, so here it is: a grow-your-own wild mushroom kit, imaginatively gifted by my other half (thanks lovely x)

The kit consisted of three types of plug, each impregnated with a different mushroom mycelium (the spore that mushrooms grow from). To grow the mushrooms, all we had to do was insert the plugs into freshly cut logs, drilling holes and then knocking in the plugs with a hammer, before sealing with a protective log wax.

Drilling holes for the plugs
Adding the mushroom mycelium
Sealing the surface with wax to prevent contamination
We foraged three lengths of freshly cut oak from a nearby wood that had been cut back, which we plugged and are now settling in under a bush in the garden.  With luck, I will have a bounty of shitake, oyster and lion's mane mushrooms sometime around Autumn.

It's a lengthy wait I'll admit, but half the fun was putting it all together and waiting for it to grow. Who says you have to choose between delayed gratification and instant pleasure?
Related Posts Plugin for WordPress, Blogger...